
I first tried out Amp Code a few months ago around the same time I started getting into Claude Code. Claude had just announced a feature where I could use my existing monthly subscription instead of paying for extra API costs, so I didn’t give Amp a fair shake.
Over the last couple of weeks, I’ve been hearing more about Amp, and Claude Code has felt a bit… not-so-magical. So I decided to give it a real shot again, and I have to say, I am extremely impressed.
In this guide, we’re going to cover what make Amp different, and how to get the most out of it. As someone who has used every vibe coding tool, app, agent, CLI, what have you, I’ve developed certain patterns for working with AI coding. I’ve covered these patterns many times before on my blog, so I’ll focus on just the Amp stuff in this one.
installation and setup
Amp has integrations with all IDEs but I prefer the CLI, so that’s what I’ll be using here. Install it globally, navigate to your project directory, and start running it.
npm install -g @sourcegraph/amp
ampIf you’re new to Amp, you’ll need to create an account and it should come with $10 in free credits (at least it did for me when I first signed up).
Once that’s done, you’ll see this beautiful screen.

As a quick aside, I have to say, I love the whole aesthetic of Amp. Their blog, their docs, even the way they write and communicate.
Anyway, let’s dive right in.
What Makes Amp Different
Aside from the great vibes? For starters, Amp is model agnostic, which means you can use it with Claude Sonnet and Opus (if you’re coming from Claude Code) or GPT-5 and Gemini 2.5 Pro.
Interestingly enough, you can’t change which model it uses under the hood (or maybe I haven’t found a way to do that). It picks the best model for the job, and defaults to Sonnet with a 1M token window. If it needs more horsepower it can switch to a model like (I think) o3 or GPT-5. You can also force it to do so by telling it to use “The Oracle”.
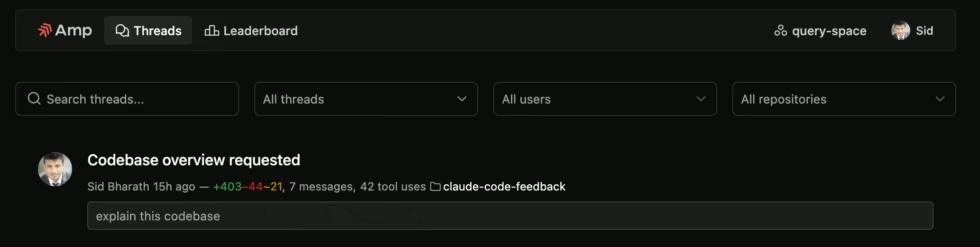
The other cool feature is that it is collaborative-ish (more on this later). You can create a shared workspace for your teammates and every conversation that someone has gets synced to that workspace, so you can view it in your dashboard. This allows you to see how others are using it and what code changes they’re making.
You can also link to a teammate’s conversation from your own to add context. This is useful if you’re taking over a feature from them.
Setting up your project
If you’re using Amp in an existing project, start by setting up an Agents.md file. This is the main context file that Amp looks for when you have a new conversation (aka Thread) with Amp.
If you’ve used Claude Code or have read my tutorial on it, you’ll see it’s the same concept, except Claude Code looks for Claude.md. I suggest following the same patterns:
- Have Amp generate the document for you by typing in /agent
- For large codebases, create one general purpose Agents.md file that talks about the overall project and conventions, and multiple specific Agents.md file for each sub-project or sub-directory. Amp will automatically pulls those in when needed.
- Use @ to mention other documentation files in your main Agents.md files.
- Periodically update these files.
If you’re in a brand new project, ask Amp to set up your project structure first and then create the Agents.md file.
Working with amp
After you’re done setting up, type in /new and start a new thread. Much like I describe in my Claude Code tutorial, we want to have numerous small and contained conversations with Amp to manage context and stay on task.
Amp works exactly like any other coding agent. You give it a task, it reasons, then uses tools like Read to gather more information, then uses tools like Write to write code. It may go back and forth, reading, editing, using other tools, and when it’s done there’s a satisfying ping sound to let you know.
If you’re working on a new feature, I suggest doing the following things:
- Create a new git branch. Ask Amp to do so, or create a custom slash command (more on this later)
- Start by planning. There’s no separate plan mode like Claude Code (which is too rigid anyway) so just ask Amp to plan first before writing code, or set up a custom slash command.
- Once you have a detailed plan, ask it to commit this to a temporary file, and then have it pick off pieces in new threads.
Amp also has a little todo feature as it keeps track of work within a thread.
Tools
Tool usage is what makes a coding agent come to life. Amp has a bunch of them built-in (your standard search, read, write, bash, etc.)
You can also customize and extend them with MCPs and custom tools. I’ve already covered MCPs on my blog before so I won’t go into too much detail here. What you need to know:
- Set up MCPs in the global Amp settings at ~/.config/amp/settings.json for MacOS
- Don’t get too crazy with them, they fill up context window, so only use a handful of MCPs. In fact, only use MCPs if you don’t have a CLI option.
The more interesting feature here is Toolboxes, to set up custom tools in Amp. This basically allows you to write custom scripts that Amp can call as tools.
You first need to set an environment variable AMP_TOOLBOX that points to a directory containing your scripts.
# Create toolbox directory
mkdir -p ~/.amp-tools
export AMP_TOOLBOX=~/.amp-tools

# Add to your shell profile for persistence
echo 'export AMP_TOOLBOX=~/.amp-tools' >> ~/.bashrcFor each script in this directory, you’ll need a function that describes the tool, and a function that executes the tool.
When Amp starts, it scans this directory and automatically discovers your custom tools. It also runs their description functions (via TOOLBOX_ACTION) so that it knows what they’re capable of. That way, when it’s deciding which tool to use, it can look through the descriptions, pick a custom tool, and then run the function that executes it.
#!/bin/bash
# ~/.amp-tools/check-dev-services

if [ "$TOOLBOX_ACTION" = "describe" ]; then
    # Output description in key-value pairs, one per line
    echo "name: check-dev-services"
    echo "description: Check the status of local development services (database, Redis, API server)"
    echo "services: string comma-separated list of services to check (optional)"
    exit 0
fi

# This is the execute phase - do the actual work
if [ "$TOOLBOX_ACTION" = "execute" ]; then
    echo "Checking local development services..."
    echo

    # Check database connection
    if pg_isready -h localhost -p 5432 >/dev/null 2>&1; then
        echo "✅ PostgreSQL: Running on port 5432"
    else
        echo "❌ PostgreSQL: Not running or not accessible"
    fi

    # Check Redis
    if redis-cli ping >/dev/null 2>&1; then
        echo "✅ Redis: Running and responding"
    else
        echo "❌ Redis: Not running or not accessible"
    fi

    # Check API server
    if curl -s http://localhost:3000/health >/dev/null; then
        echo "✅ API Server: Running on port 3000"
    else
        echo "❌ API Server: Not running on port 3000"
    fi

    echo
    echo "Development environment status check complete."
fiPermissions
Before Amp runs any tool or MCP, it needs your permission. You can create tool-level permissions in the settings or using the /permissions slash command, which Amp checks before executing a tool.
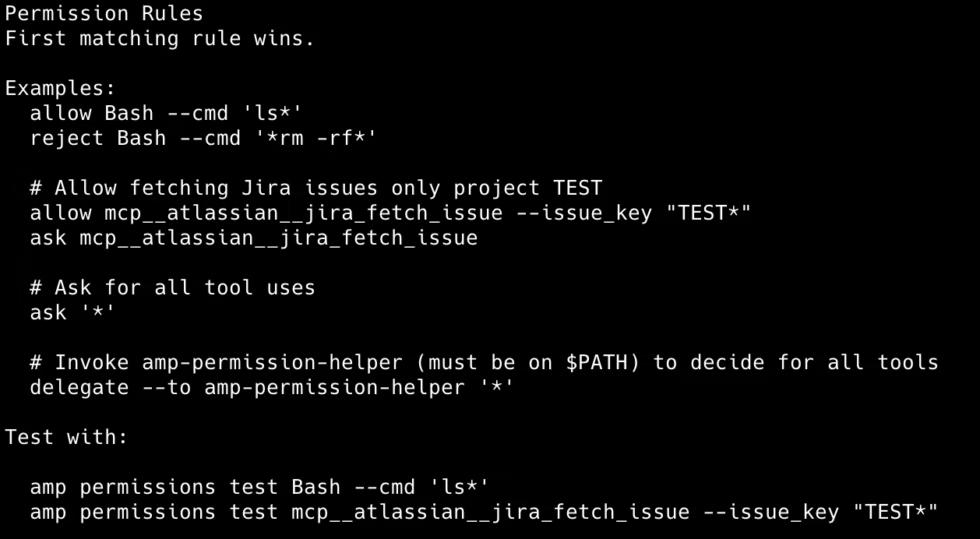
As you can see here, you can get quite granular with the permissions. You can blanket allow or reject certain tools, or have it ask you for permissions each time it uses something. You can even delegate it to an external program.
Subagents
Amp can spawn subagents via the Task tool for complex tasks that benefit from independent execution. Each subagent has its own context window and access to tools like file editing and terminal commands.
When Subagents Excel:
- Multi-step tasks that can be broken into independent parts
- Operations producing extensive output not needed after completion
- Parallel work across different code areas
- Keeping the main thread’s context clean
Subagent Limitations:
- They work in isolation and can’t communicate with each other
- You can’t guide them mid-task
- They start fresh without your conversation’s accumulated context
While you can’t define a subagent in Amp, you can directly tell Amp to spawn a subagent while you’re working with it. Say there’s a bug and you don’t want to use up the context in your main thread, tell it to spawn a subagent to fix the bug.
Slash Commands
We’ve already covered a few slash commands but if you want to see the full list of available slash commands, just type in / and they’ll pop up. You can also type /help for more shortcuts.
You can also define custom slash commands. Create a .agents/commands/ folder in your working directory and start defining them as plain text markdown files. This is where you can create the /plan command I mentioned earlier which is just an instruction to tell Amp you want to plan out a new feature and you don’t want to start coding just yet.
Team Collaboration: Multiplayer Coding
I mentioned this earlier so if you’re bringing a team onto your project, it’s worth setting up a workspace. Create this from the settings page at ampcode.com/settings.
Workspaces provide:
- Shared Thread Visibility: Workspace threads are visible to all workspace members by default
- Pooled Billing: Usage is shared across all workspace members
- Knowledge Sharing: There’s nothing like getting to see how the smartest people on your team are actually using coding agents
- Leaderboards: Each workspace includes a leaderboard that tracks thread activity and contributions
Joining Workspaces: To join a workspace, you need an invitation from an existing workspace member. Enterprise workspaces can enable SSO to automatically include workspace members.
Thread Sharing Strategies
Thread Visibility Options: Threads can be public (visible to anyone with the link), workspace-shared (visible to workspace members), or private (visible only to you).
Best Practices for Thread Sharing:
- Feature Development: Share threads showing how you implemented complex features
- Problem Solving: Share debugging sessions that uncovered interesting solutions
- Learning Examples: Share threads that demonstrate effective prompting techniques
- Code Reviews: Include links to Amp threads when submitting code for review to provide context
Final Words
I haven’t really gone into how to prompt or work with Amp because I’ve covered it in detail previously as these are patterns that apply across all coding agents (document well, start with a plan, keep threads short, use git often, etc.).
If you’re new to AI coding, I suggest you read my other guides to understand the patterns and then use this guide for Amp specific tips and tricks.
And, of course, the best way to learn is to do it yourself, so just start using Amp in a project and go from there.
If you have any questions, feel free to reach out!
Want to build your own AI agents?
Sign up for my newsletter covering everything from the tools, APIs, and frameworks you need, to building and serving your own multi-step AI agents.