Category: Blog

  • Claude Skills Tutorial: Give your AI Superpowers

    Claude Skills Tutorial: Give your AI Superpowers

    In the Matrix, there’s a scene where Morpheus is loading training programs into Neo’s brain and he wakes up from it and says, “I know Kung Fu.”

    That’s basically what Claude skills are.

    They’re a set of instructions that teach Claude how to do a certain thing. You explain it once in a document, like a training manual, and hand that to Claude. The next time you ask Claude to do that thing, it reaches for this document, reads the instructions, and does the thing.

    You never need to explain yourself twice.

    In this article, I’ll go over everything Claude Skills related, how it works, where to use it, and even how to build one yourself.

    Got Skills?

    A Skill is essentially a self-contained “plugin” (also called an Agent Skill) packaged as a folder containing custom instructions, optional code scripts, and resource files that Claude can load when performing specialized tasks.

    In effect, a Skill teaches Claude how to handle a particular workflow or domain with expert proficiency, on demand. For example, Anthropic’s built-in Skills enable Claude to generate Excel spreadsheets with formulas, create formatted Word documents, build PowerPoint presentations, or fill PDF forms, all tasks that go beyond Claude’s base training.

    Skills essentially act as on-demand experts that Claude “calls upon” during a conversation when it recognizes that the user’s request matches the Skill’s domain. Crucially, Skills run in a sandboxed code execution environment for safety, meaning they operate within clearly defined boundaries and only perform actions you’ve allowed.

    Teach Me Sensei

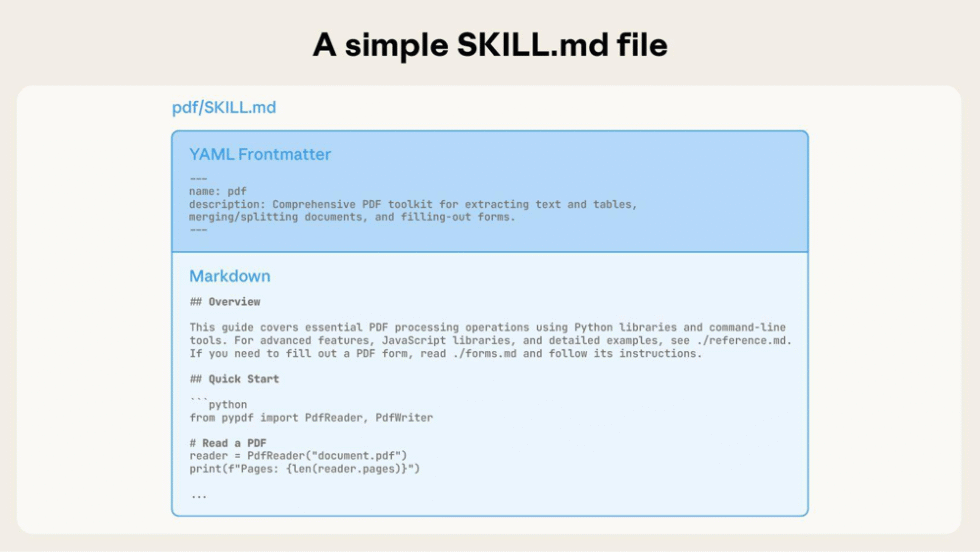
    At minimum, a Skill is a folder containing a primary file named SKILL.md (along with any supplementary files or scripts). This primary file contains the Skill’s name and description.

    This is followed by a Markdown body containing the detailed instructions, examples, or workflow guidance for that Skill. The Skill folder can also include additional Markdown files (reference material, templates, examples, etc.) and code scripts (e.g. Python or JavaScript) that the Skill uses.

    The technical magic happens through something called “progressive disclosure” (which sounds like a therapy technique but is actually good context engineering).

    At startup, Claude scans every skill’s metadata for the name and description. So in context it knows that there’s a PDF skill that can extract text.

    When you’re chatting with Claude and you ask it to analyze a PDF document, it realizes it needs the PDF skill and reads the rest of the primary file. And if you uploaded any supplementary material, Claude decides which ones it needs and loads only that into context.

    So this way, a Skill can encapsulate a large amount of knowledge or code without overwhelming the context window. And if multiple Skills seem relevant, Claude can load and compose several Skills together in one session.

    Code Execution

    One powerful aspect of Skills is that they can include executable code as part of their toolkit. Within a Skill folder, you can provide scripts (Python, Node.js, Bash, etc.) that Claude may run to perform deterministic operations or heavy computation.

    For example, Anthropic’s PDF Skill comes with a Python script that can parse a PDF and extract form field data. When Claude uses that Skill to fill out a PDF, it will choose to execute the Python helper script (via the sandboxed code tool) rather than attempting to parse the PDF purely in-token.

    To maintain safety, Skills run in a restricted execution sandbox with no persistence between sessions.

    Want to build your own AI agents?

    Sign up for my newsletter covering everything from the tools, APIs, and frameworks you need, to building and serving your own multi-step AI agents.

    wait But WHy?

    If you’ve used Claude and Claude Code a lot, you may be thinking that you’ve already come across similar features. So let’s clear up the confusion, because Claude’s ecosystem is starting to look like the MCU. Lots of cool characters but not clear how they all fit together.

    Skills vs Projects

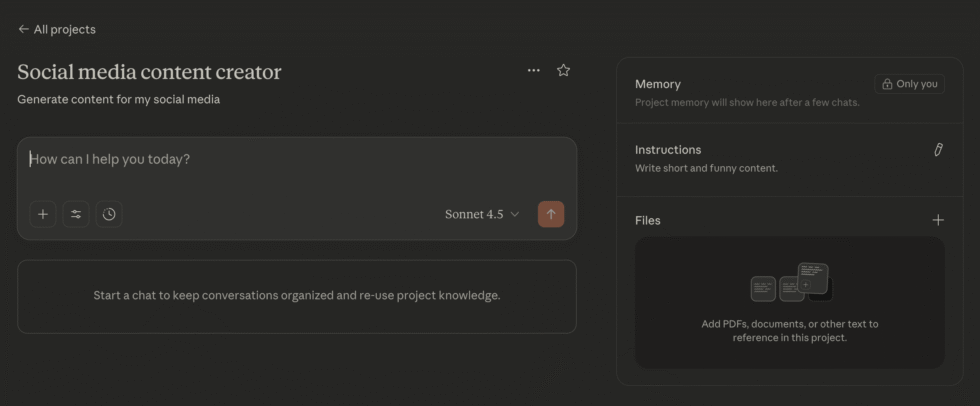
    In Claude, Projects are bounded workspaces where context accumulates. When you create a project, you can set project level instructions, like “always use the following brand guidelines”. You can also upload documents to the project.

    Now every time you start a new chat in that project, all those instructions and documents are loaded in for context. Over time Claude even remembers past conversations in that Project.

    So, yes, it does sound like Skills because within the scope of a Project you don’t need to repeat instructions.

    The main difference though is that Skills work everywhere. Create it once, and use it in any conversation, any project, or any chat. And with progressive disclosure, it only uses context when needed. You can also string multiple Skills together.

    In short, use Projects for broad behavior customization and persistent context, and use Skills for packaging repeatable workflows and know-how. Project instructions won’t involve coding or file management, whereas Skills require a bit of engineering to build and are much more powerful for automating work.

    Skills vs MCP

    If you’re not already familiar with Model Context Protocol, it’s just a way for Claude to connect with external data and APIs in a secure manner.

    So if you wanted Claude to be able to write to your WordPress blog, you can set up a WordPress MCP and now Claude can push content to it.

    Again, this might sound like a Skill but the difference here is that Skills are instructions that tell Claude how to do tasks, while MCP is what allows Claude to take the action. They’re complementary.

    You can even use them together, along with Projects!

    Let’s say you have a Project for writing blog content where you have guidelines on how to write. You start a chat with a new topic you want to write about and Claude writes it following your instructions.

    When the post is ready, you can use a skill to extract SEO metadata, as well as turn the content into tweets. Finally, use MCPs to push this content to your blog and various.

    Skills vs Slash Commands (Claude Code Only)

    If you’re a Claude Code user, you may have come across custom slash commands that allow you to define a certain process and then call that whenever you need.

    This is actually the closest existing Claude feature to a Skill. The main difference is that you, the user, triggers the custom slash command when you want it, and Skills can be called by Claude when it determines it needs that.

    Skills alos allow for more complexity whereas custom slash commands are for simpler tasks that you repeat often (like running a code review).

    Skills vs Subagents (Also Claude Code Only)

    Sub-agents in Claude Code refer to specialized AI agent instances that can be spawned to help the main Claude agent with specific sub-tasks. They have their own context window and operate independently.

    A sub-agent is essentially another AI persona/model instance running in parallel or on-demand, whereas a Skill is not a separate AI. It’s more like an add-on for the main Claude.

    So while a Skill can greatly expand what the single Claude instance can do, it doesn’t provide the parallel processing or context isolation benefits that sub-agents do.

    You already have skills

    It turns out you’ve been using Skills without realizing it. Anthropic built four core document skills:

    • DOCX: Word documents with tracked changes, comments, formatting preservation
    • PPTX: PowerPoint presentations with layouts, templates, charts
    • XLSX: Excel spreadsheets with formulas, data analysis, visualization
    • PDF: PDF creation, text extraction, form filling, document merging

    These skills contain highly optimized instructions, reference libraries, and code that runs outside Claude’s context window. They’re why Claude can now generate a 50-slide presentation without gasping for context tokens like it’s running a marathon.

    These are available to everyone automatically. You don’t need to enable them. Just ask Claude to create a document, and the relevant skill activates.

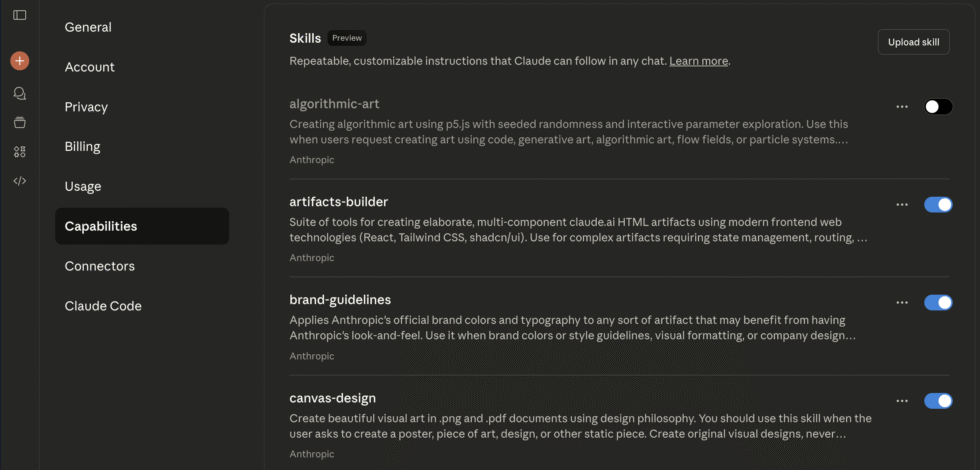
    Additionally, they’ve added a bunch of other skills and open-sourced them so you can see how they’re built and how it works. Just go to the Capabilities section in your Settings and toggle them on.

    How To Build Your Own Skill

    Of course the real value of skills comes from building your own, something that suits the work you do. Fortunately, it’s not too hard. There’s even a pre-built skill you may have noticed in the screen above that builds skills.

    But let’s walk through it manually so you understand what’s happening. On your computer, create a folder called team-report. Inside, create a file called SKILL.md:

    Python
    ---
    name: team-report #no capital letters allowed here.
    description: Creates standardized weekly team updates. Use when the user wants a team status report or weekly update.
    ---
    
    # Weekly Team Update Skill
    
    ## Instructions
    
    When creating a weekly team update, follow this structure:
    
    1. **Wins This Week**: 3-5 bullet points of accomplishments
    2. **Challenges**: 2-3 current blockers or concerns  
    3. **Next Week's Focus**: 3 key priorities
    4. **Requests**: What the team needs from others
    
    ## Tone
    - Professional but conversational
    - Specific with metrics where possible
    - Solution-oriented on challenges
    
    ## Example Output
    
    **Wins This Week:**
    - Shipped authentication refactor (reduced login time 40%)
    - Onboarded 2 new engineers successfully
    - Fixed 15 critical bugs from backlog
    
    **Challenges:**
    - Database migration taking longer than expected
    - Need clearer specs on project X
    
    **Next Week's Focus:**
    - Complete migration
    - Start project Y implementation  
    - Team planning for Q4
    
    **Requests:**
    - Design review for project Y by Wednesday
    - Budget approval for additional testing tools

    That’s it. That’s the skill. Zip it up and upload this to Claude (Settings > Capabilities > Upload Skill), and now Claude knows how to write your team updates.

    Leveling Up: Adding Scripts and Resources

    For more complex skills, you can add executable code. Let’s say you want a skill that validates data:

    Python
    data-validator-skill/
    ├── SKILL.md
    ├── schemas/
    │   └── customer-schema.json
    └── scripts/
        └── validate.py

    Your SKILL.md references the validation script. When Claude needs to validate data, it runs validate.py with the user’s data. The script executes outside the context window. Only the output (“Validation passed” or “3 errors found”) uses context.

    Best Practices

    1. Description is Everything

    Bad description: “Processes documents”

    Good description: “Extracts text and tables from PDF files. Use when working with PDF documents or when user mentions PDFs, forms, or document extraction.”

    Claude uses the description to decide when to invoke your skill. Be specific about what it does and when to use it.

    2. Show, Don’t Just Tell

    Include concrete examples in your skill. Show Claude what success looks like:

    Python
    ## Example Input
    "Create a Q3 business review presentation"
    
    ## Example Output
    A 15-slide PowerPoint with:
    - Executive summary (slides 1-2)
    - Key metrics dashboard (slide 3)
    - Performance by segment (slides 4-7)
    - Challenges and opportunities (slides 8-10)
    - Q4 roadmap (slides 11-13)
    - Appendix with detailed data (slides 14-15)

    3. Split When It Gets Unwieldy

    If your SKILL.md starts getting too long, split it:

    Python
    financial-modeling-skill/
    ├── SKILL.md              # Core instructions
    ├── DCF-MODELS.md         # Detailed DCF methodology  
    ├── VALIDATION-RULES.md   # Validation frameworks
    └── examples/
        └── sample-model.xlsx

    4. Test With Variations

    Don’t just test your skill once. Try:

    • Different phrasings of the same request
    • Edge cases
    • Combinations with other skills
    • Both explicit mentions and implicit triggers

    Security (do not ignore this)

    We’re going to see an explosion of AI gurus touting their Skill directory and asking you to comment “Skill” to get access.

    The problem is Skills can execute code, and if you don’t know what this code does, you may be in for a nasty surprise. A malicious skill could:

    • Execute harmful commands
    • Exfiltrate your data
    • Misuse file operations
    • Access sensitive information
    • Make unauthorized API calls (in environments with network access)

    Anthropic’s guidelines are clear: Only use skills from trusted sources. This means:

    1. You created it (and remember creating it)
    2. Anthropic created it (official skills)
    3. You thoroughly audited it (read every line, understand every script)

    So if you found it on GitHub or some influencer recommended it, stay away. At the very least, be skeptical and:

    • Read the entire SKILL.md file
    • Check all scripts for suspicious operations
    • Look for external URL fetches (big red flag)
    • Verify tool permissions requested
    • Check for unexpected network calls

    Treat skills like browser extensions or npm packages: convenient when trustworthy, catastrophic when compromised.

    Use Cases and Inspiration

    The best Skills are focused on solving a specific, repeatable task that you do in your daily life or work. This is different for everyone. So ask yourself: What do I want Claude to do better or automatically?

    I’ll give you a few examples from my work to inspire you.

    Meeting Notes and Proposals

    We all have our AI notetakers and they each give us summaries and transcripts that we don’t read. What matters to me is taking our conversation and extracting the client’s needs and requirements, and then turning that into a project proposal.

    Without Skills, I would have to upload the transcript to Claude and give it the same instructions every time to extract the biggest pain points, turn it into a proposal, and so on.

    With Skills, I can define that once, describing exactly how I want it, and upload that to Claude as my meeting analyzer skill. From now on, all I have to do is tell Claude to “analyze this meeting” and it uses the Skill to do it.

    Report Generator

    When I run AI audits for clients, I often hear people say that creating reports is very time consuming. Every week they have to gather data from a bunch of source sand then format it into a consistent report structure with graphs and summaries and so on.

    Now with Claude skills they can define that precisely, even adding scripts to generate graphs and presentation slides. All they have to do is dump the data into a chat and have it generate a report using the skill.

    Code Review

    If you’re a Claude Code user, building a custom code review skill might be worth your time. I had a custom slash command for code reviews but Skills offer a lot more customization with the ability to run scripts.

    Content Marketing

    I’ve alluded to this earlier in the post but there are plenty areas where I repeat instructions to Claude while co-creating content, and Skills allows me to abstract and automate that away.

    Practical Next Steps

    If you made it this far (seriously, thanks for reading 3,000 words about AI file management), here’s what to do:

    Immediate Actions:

    1. Enable Skills: Go to Settings > Capabilities > Skills
    2. Try Built-In Skills: Ask Claude to create a PowerPoint or Excel file
    3. Identify One Pattern: What do you ask Claude to do repeatedly?
    4. Create Your First Skill: Use the team report example as template
    5. Test and Iterate: Use it 5 times, refine based on results

    If you thought MCP was big, I think Skills have the potential to be bigger. If you need help with building more Skills, subscribe below and reach out to me.

    Want to build your own AI agents?

    Sign up for my newsletter covering everything from the tools, APIs, and frameworks you need, to building and serving your own multi-step AI agents.

  • Building a Competitor Intelligence Agent with Browserbase

    Building a Competitor Intelligence Agent with Browserbase

    In a previous post, I wrote about how I built a competitor monitoring system for a marketing team. We used Firecrawl to detect changes on competitor sites and blog content, and alert the marketing team with a custom report. That was the first phase of a larger project.

    The second phase was tracking the competitors’ ads and adding it to our report. The good folks at LinkedIn and Meta publish all the ads running on their platforms in a public directory. You simply enter the company name and it shows you all the ads they run. That’s the easy part.

    The tough part is automating visiting the ad libraries on a regular basis and looking for changes. Or, well, it would have been tough if I weren’t using Browserbase.

    In this tutorial, I’ll show you how I built this system, highlighting the features of Browserbase that saved me a lot of time. Whether you’re building a competitor monitoring agent, a web research tool, or any AI agent that needs to interact with real websites, the patterns and techniques here will apply.

    WHy Browserbase?

    Think of Browserbase as AWS Lambda, but for browsers. Instead of managing your own browser infrastructure with all the pain that entails, you get an API that spins up browser instances on demand, with features you need to build reliable web agents.

    Want to persist authentication across multiple scraping sessions? There’s a Contexts API for that. Need to debug why your scraper failed? Every session is automatically recorded and you can replay it like a DVR. Running into bot detection? Built-in stealth mode and residential proxies make your automation look human.

    For this project, I’m using Browserbase to handle all the browser orchestration while I focus on the actual intelligence layer: what to monitor, how to analyze it, and what insights to extract. This separation of concerns is what makes the system maintainable.

    Want to build your own AI agents?

    Sign up for my newsletter covering everything from the tools, APIs, and frameworks you need, to building and serving your own multi-step AI agents.

    What We’re Building: Architecture Overview

    This agent monitors competitor activity across multiple dimensions and generates actionable intelligence automatically.

    The system has five core components working together. First, there’s the browser orchestration layer using Browserbase, which handles session management, authentication, and stealth capabilities. This is the foundation that lets us reliably access ad platforms.

    Second, we have platform-specific scrapers for LinkedIn ads, Facebook ads, and landing pages. Each scraper knows how to navigate its platform, handle pagination, and extract structured data.

    Third, there’s a change detection system that tracks what we’ve seen before and identifies what’s new or different.

    Fourth, we have an analysis engine that processes the raw data to identify patterns, analyze creative themes, and detect visual changes using perceptual hashing.

    Finally, there’s an intelligence reporter that synthesizes everything and generates strategic insights using GPT-4.

    Each component is independent and can be improved or replaced without affecting the others. Want to add a new platform? Write a new scraper module. Want better AI insights? Swap out the analysis prompts. Want to store data differently? Replace the storage layer.

    Setting Up Your Environment

    First, you’ll need accounts for a few services. Sign up for Browserbase at browserbase.com and grab your API key and project ID from the dashboard. The free tier gives you enough sessions to build and test this system. If you want the AI insights feature, you’ll also need an OpenAI API key.

    Create a new project directory, set up a Python virtual environment, and install the key dependencies:

    Bash
    # Create and activate virtual environment
    python -m venv venv
    source venv/bin/activate  # On Windows: venv\Scripts\activate
    
    # Install dependencies
    pip install browserbase playwright pillow imagehash openai python-dotenv requests
    playwright install chromium

    Create a .env file to store the keys you got from Browserbase.

    Bash
    # .env file
    BROWSERBASE_API_KEY=your-api-key-here
    BROWSERBASE_PROJECT_ID=your-project-id-here
    OPENAI_API_KEY=sk-your-key-here

    Building the Browser Manager: Your Gateway to Browserbase

    The browser manager is the foundation of everything. This class encapsulates all the Browserbase interaction and provides a clean interface for the rest of the system. It handles session lifecycle, connection management, and proper cleanup.

    Python
    class BrowserManager:
        def __init__(self, api_key: str, project_id: str, context_id: Optional[str] = None):
            self.api_key = api_key
            self.project_id = project_id
            self.context_id = context_id
            
            # Initialize the Browserbase SDK client
            # This handles all API communication with Browserbase
            self.bb = Browserbase(api_key=api_key)
            
            # These will hold our active resources
            # We track them as instance variables so we can clean up properly
            self.session = None
            self.playwright = None
            self.browser = None
            self.context = None
            self.page = None


        def connect_browser(self):
            """
            Connect to the Browserbase session using Playwright.
            
            This is where the magic happens - we're connecting to a real Chrome
            browser running in Browserbase's infrastructure. From here on, it's
            just standard Playwright code, but with all of Browserbase's superpowers.
            """
            if not self.session:
                raise RuntimeError("No session created. Call create_session() first.")
            
            
            # Initialize Playwright
            self.playwright = sync_playwright().start()
            
            # Connect to the remote browser using the session's connect URL
            # This is CDP (Chrome DevTools Protocol) under the hood
            self.browser = self.playwright.chromium.connect_over_cdp(
                self.session.connectUrl
            )
            
            # Get the default context and page that Browserbase created
            # Note: If you specified a context_id, this context will have your
            # saved authentication state automatically loaded
            self.context = self.browser.contexts[0]
            self.page = self.context.pages[0]
                    
            return self.page

    Let’s write a function to create a new Browserbase session with custom configuration.

    We’ll enable stealth to make our agent look like a real human and not trip up the bot detectors. And we’ll set up a US proxy.

    You can also set session timeouts, or keep sessions alive even if your code crashes (though we aren’t doing that here).

    Python
    def create_session(self, 
                       timeout: int = 300,
                       enable_stealth: bool = True,
                       enable_proxy: bool = True,
                       proxy_country: str = "us",
                       keep_alive: bool = False) -> Dict[str, Any]:
            
        session_config = {
            "projectId": self.project_id,
            "browserSettings": {
              "stealth": enable_stealth,
              "proxy": {
                "enabled": enable_proxy,
                "country": proxy_country
              } if enable_proxy else None
            },
           
            "timeout": timeout,
            "keepAlive": keep_alive
        }
            
            # If we have a context ID, include it to reuse authentication state
            # This is the secret sauce for avoiding repeated logins
        if self.context_id:
            session_config["contextId"] = self.context_id
            
        self.session = self.bb.sessions.create(**session_config)
        session_id = self.session.id
        connect_url = self.session.connectUrl
        replay_url = f"https://www.browserbase.com/sessions/{session_id}"
            
        return {
            "session_id": session_id,
            "connect_url": connect_url,
            "replay_url": replay_url
        }

    You’ll notice we get back a replay URL. This is where we can actually watch the browser sessions and debug what went wrong.

    Next, we connect to our browser session using Playwright, an open-source browser automation library by Microsoft.

    Python
    def connect_browser(self):
        self.playwright = sync_playwright().start()
        self.browser = self.playwright.chromium.connect_over_cdp(
            self.session.connectUrl
        )
            
        # Get the default context and page that Browserbase created
        self.context = self.browser.contexts[0]
        self.page = self.context.pages[0]
    
        return self.page

    Finally, we want to clean up all resources and close our browser sessions:

    Python
    if self.page:
        self.page.close()
    if self.context:
        self.context.close()
    if self.browser:
        self.browser.close()
    if self.playwright:
        self.playwright.stop()

    So basically you create a session with specific settings, then connect to it, do some work, disconnect, and connect again later.

    The configuration parameters I exposed are the ones I found most useful in production. Stealth mode is almost always on because modern platforms are too good at detecting automation. Proxy support is optional but recommended for platforms that rate-limit by IP.

    Creating and Managing Browserbase Contexts

    Before we build the scrapers, I want to show you one of Browserbase’s most powerful features: Contexts.

    A Context in Browserbase is like a reusable browser profile. It stores cookies, localStorage, session storage, and other browser state.

    You can create a context once with all your authentication, then reuse it across multiple browser sessions. This means you log into LinkedIn once, save that authenticated state to a context, and every future session can reuse those credentials without going through the login flow again.

    We don’t actually need this feature for scraping LinkedIn Ads Library because it’s public, but if you want to scrape another ad library that requires a login, it’s very useful. Here’s a sample function that handles the one-time authentication flow for a platform and saves the resulting authenticated state to a reusable context.

    Python
    def create_authenticated_context(api_key: str, project_id: str, 
                                     platform: str, credentials: Dict[str, str]) -> str:
    
        # Create a new context
        bb = Browserbase(api_key=api_key)
        context = bb.contexts.create(projectId=project_id)
        context_id = context.id
    
        # Create a session using this context
        # Any cookies or state we save will be persisted to the context
        with BrowserManager(api_key, project_id, context_id=context_id) as mgr:
            session_info = mgr.create_session(timeout=300)
            page = mgr.connect_browser()
            if platform == "linkedin":
                page.goto("https://www.linkedin.com/login", wait_until="networkidle")
                page.fill('input[name="session_key"]', credentials['email'])
                page.fill('input[name="session_password"]', credentials['password'])
                page.click('button[type="submit"]')
                page.wait_for_url("https://www.linkedin.com/feed/", timeout=30000)
                            
            elif platform == "facebook":
                # Similar flow for Facebook
      
        return context_id

    Authentication state is saved to the context ID which you can then reuse to avoid future logins.

    Building Platform-Specific Scrapers

    Now we get to the interesting part: actually scraping data from ad platforms. I’m only going to show you the LinkedIn ad scraper because it demonstrates several important patterns and the concepts are the same across all platforms.

    It’s really just one function that takes a Browserbase page object and returns structured data. This separation means the browser management is completely isolated from the scraping logic, which makes everything more testable and maintainable.

    First we navigate to the ad library and wait until the network is idle as it loads data dynamically. We then fill the company name into the search box, add a small delay to mimic human behaviour, then press enter.

    Python
    def scrape_linkedin_ads(page: Page, company_name: str, max_ads: int = 20) -> List[Dict[str, Any]]:
        ad_library_url = "https://www.linkedin.com/ad-library"
        page.goto(ad_library_url, wait_until="networkidle")
    
        search_box = page.locator('input[aria-label*="Search"]')
        search_box.fill(company_name)
        time.sleep(1)  # Human-like pause
        search_box.press("Enter")
        
        # Wait for results to load
        # LinkedIn's ad library is a SPA that loads content dynamically
        time.sleep(3)
        
        ads_data = []
        scroll_attempts = 0
        max_scroll_attempts = 10

    The LinkedIn ads library is a SPA that loads content dynamically so we wait for it to load before we start our scraping.

    We’re going to implement infinite scroll to load more ads. First we find ad cards currently visible, and use multiple selectors in case LinkedIn changes their markup.

    Python
    while len(ads_data) < max_ads and scroll_attempts < max_scroll_attempts:
            ad_cards = page.locator('[data-test-id*="ad-card"], .ad-library-card, [class*="AdCard"]').all()
                    
            for card in ad_cards:
                if len(ads_data) >= max_ads:
                    break
                    
                try:
                    ad_data = {
                        "platform": "linkedin",
                        "company": company_name,
                        "scraped_at": time.strftime("%Y-%m-%d %H:%M:%S")
                    }
                    
                    try:
                        headline = card.locator('h3, [class*="headline"], [data-test-id*="title"]').first
                        ad_data["headline"] = headline.inner_text(timeout=2000)
                    except:
                        ad_data["headline"] = None
                    
                    # Extract body text/description
                    try:
                        body = card.locator('[class*="description"], [class*="body"], p').first
                        ad_data["body"] = body.inner_text(timeout=2000)
                    except:
                        ad_data["body"] = None
                    
                    # Extract CTA button text if present
                    try:
                        cta = card.locator('button, a[class*="cta"], [class*="button"]').first
                        ad_data["cta_text"] = cta.inner_text(timeout=2000)
                    except:
                        ad_data["cta_text"] = None
                    
                    # Extract image URL if available
                    try:
                        img = card.locator('img').first
                        # Scroll image into view to trigger lazy loading
                        img.scroll_into_view_if_needed()
                        time.sleep(0.5)  # Give it time to load
                        ad_data["image_url"] = img.get_attribute('src')
                    except:
                        ad_data["image_url"] = None
                    
                    # Extract landing page URL
                    try:
                        link = card.locator('a[href*="http"]').first
                        ad_data["landing_url"] = link.get_attribute('href')
                    except:
                        ad_data["landing_url"] = None
                    
                    # Extract any visible metadata (dates, impressions, etc)
                    try:
                        metadata = card.locator('[class*="metadata"], [class*="stats"]').all_inner_texts()
                        ad_data["metadata"] = metadata
                    except:
                        ad_data["metadata"] = []
                    
                    # Only add the ad if we extracted meaningful data
                    if ad_data.get("headline") or ad_data.get("body"):
                        ads_data.append(ad_data)
                      
                except Exception as e:
                    print(f"Error extracting ad card: {e}")
                    continue
            
            # Scroll to load more ads
            page.evaluate("window.scrollTo(0, document.body.scrollHeight)")
            time.sleep(2)  # Wait for new content to load
            
            scroll_attempts += 1
        
        return ads_data

    I’m limiting scroll attempts to prevent infinite loops on platforms that don’t load additional content.

    I’m also adding small delays that mimic human behavior. The time dot sleep calls between actions aren’t strictly necessary for functionality, but they make the automation look more natural to bot detection systems. Real humans don’t type instantly and don’t scroll at superhuman speeds.

    You can repeat these patterns yourself to scrape other ad libraries, landing pages and so on.

    Building the Change Tracking Database

    Now we need persistence to track what we’ve seen before and identify what’s new. We’ll create a SQLite database with two main tables: one for ad snapshots, and one for tracking detected changes. Each table has the fields we need for analysis, plus a snapshot date so we can track things over time.

    I’m not going to share the code here because it’s just a bunch of SQL commands to set up the tables, like this:

    SQL
    CREATE TABLE IF NOT EXISTS ads (
        id INTEGER PRIMARY KEY AUTOINCREMENT,
        competitor_id TEXT NOT NULL,
        platform TEXT NOT NULL,
        ad_identifier TEXT,
        headline TEXT,
        body TEXT,
        cta_text TEXT,
        image_url TEXT,
        landing_url TEXT,
        metadata TEXT,
        snapshot_date DATETIME NOT NULL,
        UNIQUE(competitor_id, platform, ad_identifier, snapshot_date)
    )

    For every ad we scrape, we simply store it in the table. We also give each ad a unique identifier. Normally I would suggest hashing the data so that any change in a word or pixel gives us a new identifier. But a basic implementation can be something like

    SQL
    ad_identifier = f"{ad.get('headline', '')}:{ad.get('body', '')}"[:200]

    So if the headline or body changes, it is a new ad. We can then do something like:

    Python
    for ad in current_ads:
        ad_identifier = f"{ad.get('headline', '')}:{ad.get('body', '')}"[:200]
        cursor.execute("""
            SELECT COUNT(*) FROM ads
            WHERE competitor_id = ? AND platform = ? AND ad_identifier = ?
                """, (competitor_id, platform, ad_identifier))
                
        count = cursor.fetchone()[0]
                
        if count == 0:
            new_ads.append(ad)
               
        if new_ads:
            self._log_change(
                competitor_id=competitor_id,
                change_type="new_ads",
                platform=platform,
                change_description=f"Detected {len(new_ads)} new ads on {platform}",
                severity="high" if len(new_ads) > 5 else "medium",
                data={"ad_count": len(new_ads), "headlines": [ad.get('headline') for ad in new_ads[:5]]}
            )
            
        return new_ads

    The log change function stores it in our changes table, which we then use to generate a report.

    Generating AI-Powered Intelligence Reports

    Now we take all this raw data and turning it into actionable insights using AI. Most of this is just prompt engineering. We pass in all the data we collected and the changes we’ve detected and ask GPT-5 to analyze it and generate a report:

    Python
    prompt = f"""Generate an executive summary of competitive intelligence findings.
    
    High Priority Changes ({len(high_severity)}):
    {json.dumps([{k: v for k, v in c.items() if k in ['competitor_id', 'change_type', 'change_description']} for c in high_severity[:10]], indent=2)}
    
    Medium Priority Changes ({len(medium_severity)}):
    {json.dumps([{k: v for k, v in c.items() if k in ['competitor_id', 'change_type', 'change_description']} for c in medium_severity[:10]], indent=2)}
    
    Please provide:
    
    1. **TL;DR**: A two to three sentence summary of the most important findings
    2. **Key Threats**: Competitive moves we should be concerned about and why
    3. **Opportunities**: Gaps or weaknesses we could exploit to gain advantage
    4. **Recommended Actions**: Top three strategic priorities based on this intelligence
    
    Keep it concise and focused on actionable insights. Format in markdown."""

    Running Our System

    And that’s our competitive analysis system! You can write a main.py file that coordinates all the components we’ve built into a cohesive workflow.

    I’ve only shown you how to scrape the LinkedIn ads library but you can use similar code to do it for other platforms.

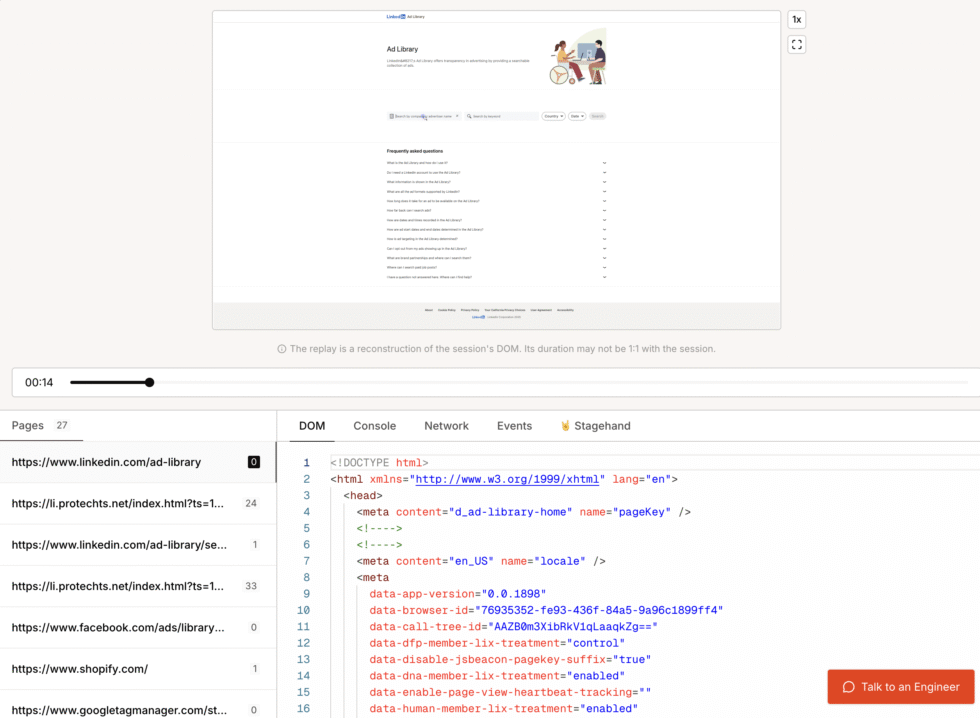
    If anything goes wrong, the Session Replays are your friends. This is where you can see our system navigate different pages, and what the DOM looks like.

    So, for example, if you’re trying to click on an element and there’s an error, you can check the session replay and see that the element didn’t load. Then you try to add a delay to let it load, and run it again.

    Browserbase also has a playground where you can iterate rapidly and run browser sessions before you figure out what works.

    Next Steps

    As I mentioned, this is part of a larger project for my client. There are so many directions you could take this.

    You could add more platforms like Twitter ads, or Google Display Network, each platform is just another scraper function using the same browser management infrastructure. You could implement trend analysis that tracks how competitor strategies evolve over months. You could create a dashboard for visualizing the intelligence using something like Streamlit.

    More importantly, these same patterns work for any AI agent that needs to interact with the web. With Browserbase, you can build:

    • Research assistants that gather information from multiple sources and synthesize it into reports.
    • Data collection agents that extract structured data from websites at scale for analysis.
    • Workflow automation that bridges systems without APIs by mimicking human browser interactions.

    If you need help, reach out to me!

    Want to build your own AI agents?

    Sign up for my newsletter covering everything from the tools, APIs, and frameworks you need, to building and serving your own multi-step AI agents.

  • Factory.ai: A Guide To Building A Software Development Droid Army

    Factory.ai: A Guide To Building A Software Development Droid Army

    Last week, Factory gave us a masterclass in how to launch a product in a crowded space. While every major AI company and their aunt already has a CLI coding agent, all I kept hearing about was Factory and their Droid agents.

    So, it is just another CLI coding agent or is there some sauce to the hype? In this article, I’m going to do a deep dive into how to set up Factory, build (or fix) apps with it, and all the features that make it stand out in this crowded space.

    Quick note – I’ve previously written about Claude Code and Amp, which have been my two coding agents of choice, so I’ll naturally make comparisons to them or reference some of their features in this as contrast. I’ve also written about patterns to use when coding with AI, which is model/agent/provider agnostic, so I won’t be covering them again in this post.

    Let’s dive in.

    Are These The Droids You’re Looking For?

    Fun fact, Factory incorporated as The San Francisco Droid Company but were forced to change their name because LucasFilm took offence. But yes, it’s a Star Wars reference and they kept the droids, so you’ll be seeing more Star Wars references through this post. Don’t say I didn’t warn you.

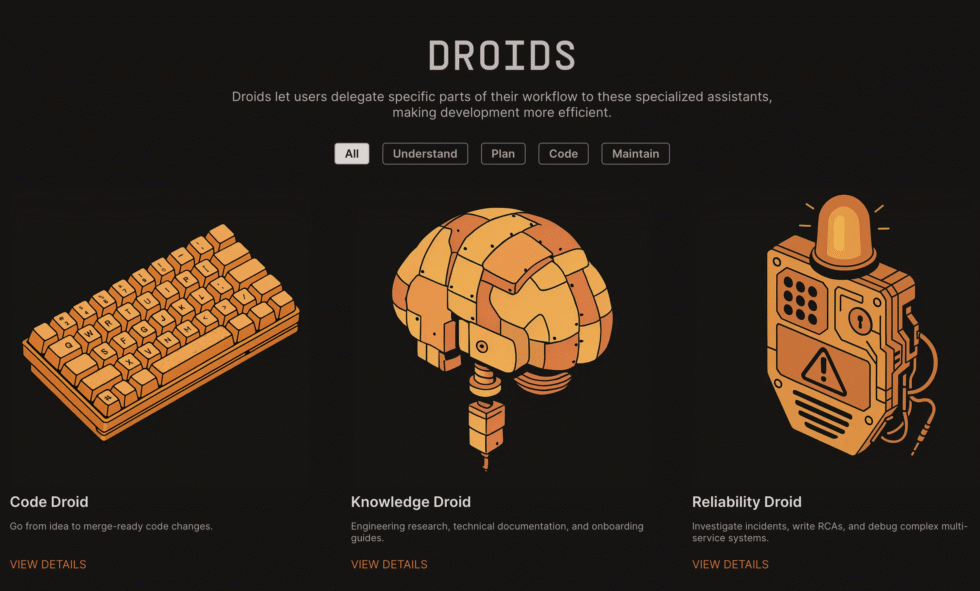
    The Droids seem to be one of the main differentiators. The core philosophy here is that software development is more than just coding and code gen. There are a bunch of tasks that many software engineers don’t particularly enjoy doing. In Factory, you just hand it off to a Droid that specializes in that task.

    They’re really just specialized agents. You can set your own up in Claude Code and Amp, but in Factory they come pre-built with optimized system prompts, specialized tools, and an appropriate model.

    Code Droid: Your main engineering Droid. Handles feature development, refactoring, bug fixes, and implementation work. This is the Droid you’ll interact with most for actual coding tasks.

    Knowledge Droid: Research and documentation specialist. Searches your codebase, docs, and the entire internet to answer complex questions. Writes specs, generates documentation, and helps you understand legacy systems.

    Reliability Droid: Your on-call specialist. Triages production alerts, performs root cause analysis, troubleshoots incidents, and documents the resolution. Saves your sleep schedule.

    Product Droid: Ticket and PM work automation. Manages your backlog, prioritizes tickets, handles assignment, and transforms rambling Slack threads into coherent product specs.

    Tutorial Droid: Helps you learn Factory itself. Think of it as your onboarding assistant.

    Installing the CLI: Getting Your Droid Army Ready

    Factory has a web interface and an IDE extension, but I’m going to focus on the CLI as it’s what most developers use these days. It’s pretty easy to install:

    Bash
    # Install droid
    curl -fsSL https://app.factory.ai/cli | sh
    
    # Navigate to your project
    cd your-project
    
    # Start your development session
    droid

    On first launch, you’ll see Droid’s welcome screen in a full-screen terminal interface. If prompted, sign in via your browser to authenticate. You start off with a bunch of free tokens, so you can use it right away.

    If you’ve used Claude Code, Amp, or any other coding CLI, you’ll find the interface familiar. In fact, it has the same “multiple modes” feature as Claude Code where you can cycle through default, automatic, and planning using shift-tab.

    If you’re in a project with existing code, start by asking droid to explain it to you. It will read your codebase and respond with insights about your project structure, test frameworks, conventions, and how everything connects.

    Specification Mode: Planning Before Building

    Now switch to Spec mode by hitting Shift-Tab and explain what you want it to do.

    Bash
    > Add a feature for users to export their personal data as JSON.
    > Include proper error handling and rate limiting to prevent abuse.
    > Follow our existing patterns for API endpoints.

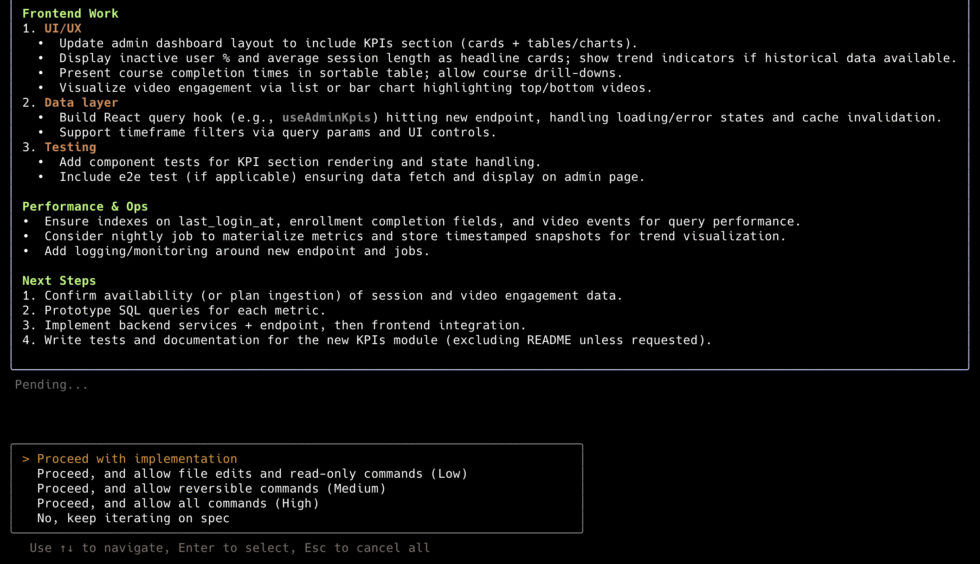
    Droid generates a complete specification that includes:

    • Acceptance Criteria: What “done” looks like
    • Implementation Plan: Step-by-step approach
    • Technical Details: Libraries, patterns, security considerations
    • File Changes: Which files will be created/modified
    • Testing Strategy: What tests need to be written

    Build Mode

    You review the spec. If something’s wrong or missing, you can hit Escape and correct it. Once you’re satisfied, you have multiple options. You can accept the spec and let it run on default mode where it asks for permissions for every change. Or you can process with one of 3 levels of autonomy:

    • Proceed, manual approval (Low): Allow file edits but approve every other change
    • Proceed, allow safe commands (Medium): Droid handles reversible changes automatically, asks for risky ones
    • Proceed, allow all commands (High): Full autonomy, Droid handles everything

    Start with low autonomy and as you build trust with the tool, work your way up. Follow my patterns to ensure that if anything goes wrong, it can always be saved.

    Spec Files Are Saved

    One really interesting feature is that Droid saves approved specs as markdown files in .factory/docs/. You can toggle this on or off and specify the save directory in the settings (using the /settings command). This means:

    • You have documentation of decisions
    • New team members can understand why things were built certain ways
    • Future Droid sessions can reference these decisions

    When using Claude Code I often ask it to save the plan as a markdown, so I love that this is an automatic feature in Factory.

    Roger, Roger: Context For Your Droids

    Another differentiating feature of Factory is the way it manages context. I’ve written about this before in how to build your own coding agent, but giving your agent the right context is what makes or breaks its performance.

    Think about it, all these agents use the same underlying models, right? So why does one perform better? It’s the way they handle context. And Factory has multiple layers to it.

    Layer 1: The AGENTS.md File

    The primary context file is Agents.md, a standard file that tells AI agents how to work with your project. If you’re coming from Claude Code, it’s basically the same as the Claude.md file. It gets ingested at the start of every conversation.

    Your codebase has conventions that aren’t in the code itself, like how to run tests, code style preferences, security requirement, PR guidelines, and build/deployment processes. AGENTS.md documents these for Droids (and other AI coding tools). It’s something you should set up for every project at the start.

    If you have a Claude.md file already, just duplicate it and rename it to Agents.md. Or you can ask Droid to write one for you. It should look something like this:

    Markdown
    # MyProject
    
    Brief overview of what this project does.
    
    ## Build & Commands
    
    - Install dependencies: `pnpm install`
    - Start dev server: `pnpm dev`
    - Run tests: `pnpm test --run`
    - Run single test: `pnpm test --run <path>.test.ts`
    - Type-check: `pnpm check`
    - Auto-fix style: `pnpm check:fix`
    - Build for production: `pnpm build`
    
    ## Project Layout
    
    ├─ client/      → React + Vite frontend
    ├─ server/      → Express backend
    ├─ shared/      → Shared utilities
    └─ tests/       → Integration tests
    
    - Frontend code ONLY in `client/`
    - Backend code ONLY in `server/`
    - Shared code in `shared/`
    
    ## Development Patterns
    
    **Code Style**:
    - TypeScript strict mode
    - Single quotes, trailing commas, no semicolons
    - 100-character line limit
    - Use functional patterns where possible
    - Avoid `@ts-ignore` - fix the type issue instead
    
    **Testing**:
    - Write tests FIRST for bug fixes
    - Visual diff loop for UI changes
    - Integration tests for API endpoints
    - Unit tests for business logic
    
    **Never**:
    - Never force-push `main` branch
    - Never commit API keys or secrets
    - Never introduce new dependencies without team discussion
    - Never skip running `pnpm check` before committing
    
    ## Git Workflow
    
    1. Branch from `main` with descriptive name: `feature/<slug>` or `bugfix/<slug>`
    2. Run `pnpm check` locally before committing
    3. Force-push allowed ONLY on feature branches using `git push --force-with-lease`
    4. PR title format: `[Component] Description`
    5. PR must include:
       - Description of changes
       - Testing performed
       - Screenshots for UI changes
    
    ## Security
    
    - All API endpoints must validate input
    - Use parameterized queries for database operations
    - Never log sensitive data
    - API keys and secrets in environment variables only
    - Rate limiting on all public endpoints
    
    ## Performance
    
    - Images must be optimized before committing
    - Frontend bundles should stay under 500KB
    - API endpoints should respond in under 200ms
    - Use lazy loading for routes
    
    ## Common Commands
    
    **Reset database**:
    ```bash
    pnpm db:reset

    You can also set up multiple Agents.md files to manage context better:

    /AGENTS.md ← Repository-level conventions
    /packages/api/AGENTS.md ← API-specific conventions
    /packages/web/AGENTS.md ← Frontend-specific conventions

    Layer 2: Dynamic Code Context

    When you submit a query, Droid’s first move is usually searching the most relevant files without manually specifying them. You can of course @ mention files but it’s best to let it figure it out on its own and help it when needed.

    Since it already has an understanding of your repository from the Agents.md file, it knows where to go looking. It picks out the right sections of code, makes sure it isn’t duplicating context, and also lazy loads context (only pulls in context when necessary).

    Factory also captures build outputs, test results, and so on as you execute commands to add to the context.

    Layer 3: Tool Integrations

    One big friction point in development is dealing with context scattered across code, docs, tickets, etc.

    When you go through the sign up process in the Factory web app, the first thing it will prompt you to do is integrate your development tools, so the Droids have the context they need.

    The most essential integration is your source code repository. You can connect Factory to your GitHub or GitLab account (cloud or self-hosted) so it can access your codebase. This is required because the Droids need to read and write code on your projects.

    But the real differentiator is the integrations to other tools where context lives:

    Observability & Logs (Sentry, Datadog):

    • Error traces from production
    • Performance metrics
    • Incident history
    • Stack traces

    Documentation (Notion, Google Docs):

    • Architecture decision records (ADRs)
    • Design documents
    • Onboarding guides
    • API specifications

    Project Management (Jira, Linear):

    • Ticket descriptions and requirements
    • Acceptance criteria
    • Related issues and dependencies
    • Discussion threads

    Communication (Slack):

    • Technical discussions
    • Decisions made in channels
    • Problem-solving threads
    • Team conventions established in chat

    Version Control (GitHub, GitLab):

    • Branch strategies
    • Commit history and messages
    • Pull request discussions
    • Code review feedback

    If you connect these tools, your Droid can understand your entire project. It can see your code, read design docs, check Jira tickets, review logs from Sentry, and more, all to give you better help.

    Layer 4: Organizational Memory

    Factory maintains two types of persistent memory that survives across sessions:

    User Memory (Private to you):

    • Your development environment setup (OS, containers, tools)
    • Your work history (repos you’ve edited, features you’ve built)
    • Your preferences (diff view style, explanation depth, testing approach)
    • Your common patterns (how you structure code, naming conventions you prefer)

    Organization Memory (Shared across team):

    • Company-wide style guides and conventions
    • Security requirements and compliance rules
    • Architecture patterns and anti-patterns
    • Onboarding procedures

    How Memory Works:

    As you interact with Droids, Factory quietly records stable facts. If you say “Remember that our staging environment is at staging.company.com”, Factory saves this. Next session, Droid already knows.

    If your teammate says “Always use snake_case for API endpoints”, that goes into Org Memory. Now every developer’s Droid follows this convention automatically.

    Context In Action

    Let’s say you implementing a new feature and need to follow the architecture defined in a design doc.

    Bash
    > Implement the notification system described in this Notion doc:
    > https://notion.so/team/notification-system-architecture

    Behind the Scenes:

    1. Droid fetches Notion document content
    2. Parses architecture decisions and requirements
    3. Search finds existing notification patterns
    4. Org Memory recalls team’s event-driven architecture conventions
    5. Agents.md shows where notification code should live

    Droid implements according to:

    • Architecture specified in the doc
    • Existing patterns in your codebase
    • Team conventions from Org Memory
    • Your project structure

    Customizing Factory

    Factory.ai becomes even more powerful when you hook it into the broader ecosystem of tools and services your project uses. We’ve already discussed integrations like source control, project trackers, and knowledge bases for providing context.

    Here we’ll focus on tips for integrating external APIs or data sources into your Factory workflows, and using custom AI models or agents.

    Connecting APIs & External Data

    Suppose your project needs data from a third-party API (e.g., a weather service or your company’s internal API). While building your project, you can certainly have the AI write code to call those APIs (it’s quite good at using SDKs or HTTP requests if you provide the API docs).

    Another approach is using the web access tool if enabled: Factory’s Droids can have a web browsing tool to fetch content from URLs. You could give the AI a link to API documentation or an external knowledge source and it can then fetch and read it to inform its actions (with your permission).

    Always ensure you’re not exposing sensitive credentials in the chat. Use environment variables for any secrets.

    Using Slack and Chats

    Factory integrates with communication platforms like Slack , which means you can interact with your Droids through chat channels.

    For instance, you can mention it with questions or commands. Type “@factory summarize the changes in release 1.2” and the AI will respond in thread with answers or code suggestions.

    Ask it to fix an error“@factory help debug this error: <paste error log>” and it will go off and do it on its own.

    Customizing and Extending Agents

    You can also create Custom Droids (essentially custom sub-agents), much like you do in Claude Code. For example, you could create a “Security Auditor” droid that has a system prompt instructing it to only focus on security concerns, with tools set to read-only mode.

    You define these in .factory/droids/ as markdown files with some YAML frontmatter (name, which model to use, which tools it’s allowed, etc.) and instructions. Once enabled, your main Droid (the primary assistant) can delegate tasks to these sub-droids.

    Custom Slash Commands

    In a similar vein, you can create your own slash commands to automate routine actions or prompts. For example, you might have a /run-test command that triggers a shell script to run your test suite and returns results to the chat. The AI could then monitor those logs and alert if something looks wrong.

    Factory allows you to define these commands either as static markdown templates (the content gets injected into the conversation) or as executable scripts that actually run in your environment.

    Bring Your Own Model Key

    While Factory comes with all the latest coding models (which you can select using /model), you can also use your own key. The benefit is you still get Factory’s orchestration, memory, and interface, but with the model of your choice. You would pay your own API costs but get to use Factory for free.

    Droid Exec

    Droid Exec is Factory’s headless CLI mode: instead of an interactive chat, you run a single, non-interactive command that does the work and exits. It’s built for automation like CI pipelines, cron jobs, pre-commit hooks, and one-off batch scripts.

    So you can say something like:

    Bash
    droid exec --auto high "run tests, commit all changes, and push to main"

    And just walk away. Your droid will follow your commands and complete the task on its own.

    There’s Three Of Us and One Of Him

    As I mentioned earlier, Factory also has a web app and an IDE integration.

    The web application provides an interactive chat-based environment for your AI development assistant. On your first login, you’ll typically see a default session with Code Droid selected (the agent specialized in coding) and an empty workspace ready to connect to your code.

    You can connect directly to a remote repository on GitHub or to your local repository via the Factory Bridge app. And once you do that, you can run Factory as a cloud agent!

    The UI here is pretty much a chat interface, so you’d use it just like the terminal. You still have @ commands to select certain files or even a Google doc or Linear ticket.

    You can also upload files directly into the chat if you want the AI to consider some code, data, and even screenshots not already in the repository.

    Sessions and Collaboration

    Each chat corresponds to a session, which can be project-specific. Factory is designed for teams, so sessions can potentially be shared or revisited by your team members (for example, an ongoing “incident response” session in Slack, or a brainstorming session for a design doc).

    In the web app, you can create multiple sessions (e.g., one per feature or task) and switch between them. You can also see any sessions you started from the CLI. Useful if you want to catch up on a previous session or share with a teammate.

    Guess I’m The Commander Now

    Factory has actually been around for a couple of years, but they’ve been focused mostly on enterprise deployments. This is obvious from its team features and integrations.

    With the recent launch, it looks like they’re trying to enter the broader market, and their message seems to be that they’re a platform to deploy agents not just for code generation, but across the software development lifecycle and the tools your company uses to build and mange products.

    So if you’re a solo developer, you probably won’t notice much of a difference switching from Claude Code or Codex, aside from how the agent works in your terminal or IDE.

    But if you’re part of a larger engineering team with an existing codebase, Factory is a much different experience, especially if you plug in all your tools and set up automations where your droids can run in the background and get tasks done.

    And at that point, you can focus on the big picture while the droid army executes your vision.

    Kinda like a commander.

    Want to build your own AI agents?

    Sign up for my newsletter covering everything from the tools, APIs, and frameworks you need, to building and serving your own multi-step AI agents.

  • Automating Competitor Research with Firecrawl: A Comprehensive Tutorial

    Automating Competitor Research with Firecrawl: A Comprehensive Tutorial

    I recently worked with a company to help their marketing team set up a custom competitive intelligence system. They’re in a hyper-competitive space and with new AI products sprouting up in their industry every day, the list of companies they keep tabs on is multiplying.

    While the overall project is part of a larger build to eventually generate sales enablement content, BI dashboards, and competitive landing pages, I figured I’d share how I built the core piece here.

    In this deep-dive tutorial, I’ll show you how to build an automated competitor monitoring system using Firecrawl that not only tracks changes but provides actionable intelligence, with just basic Python code.

    Why Firecrawl?

    You can absolutely build your own web scraping tool. There are some packages like Beautiful Soup that make it easier. But it’s just annoying. You have to parse complex HTML and handle JS rendering. Your selectors break. You fight anti-bot measures.

    And that doesn’t even count the cleaning and structuring of extracted data. Basically, you spend more time maintaining your scraping infrastructure than actually analyzing competitive data.

    Firecrawl flips this equation. Instead of battling technical complexity, you describe what you want in plain English. Firecrawl’s AI understands context, handles the technical heavy lifting, and returns clean, structured data.

    Out of the box, it provides:

    • Automatic JavaScript rendering: No need for Selenium or Puppeteer
    • AI-powered extraction: Describe what you want in natural language
    • Clean markdown output: No HTML parsing needed
    • Built-in rate limiting: Respectful scraping by default
    • Structured data extraction: Get JSON data with defined schemas

    Think of Firecrawl as having a smart assistant who visits websites for you, understands what’s important, and returns exactly the data you need.

    The Solution Architecture

    The system has four core components working together.

    • The Data Extractor acts like a research librarian, systematically gathering information from target sources and organizing it consistently.
    • The Change Detector functions like an analyst, comparing new information against historical data to identify what’s different and why it matters.
    • The Report Generator serves as a communications specialist, transforming technical changes into business insights that inform decision-making.
    • The Storage Layer works like an institutional memory, maintaining historical context that enables trend analysis and pattern recognition.

    We’re just going to build this as a one-directional pre-defined process but if you wanted to make this agentic, each of these components would become a sub-agent

    For this tutorial, we’ll monitor Firecrawl’s own website as our “competitor.” This gives us a real, working example that you can run immediately while learning the concepts. The techniques transfer directly to monitoring actual competitors.

    Want to build your own AI agents?

    Sign up for my newsletter covering everything from the tools, APIs, and frameworks you need, to building and serving your own multi-step AI agents.

    Prerequisites and Setup

    Before we start coding, let’s ensure you have everything needed:

    Markdown
    # Check Python version (need 3.9+)
    python --version
    
    # Create project directory
    mkdir competitor-research
    cd competitor-research
    
    # Create virtual environment (recommended)
    python -m venv venv
    source venv/bin/activate  # On Windows: venv\Scripts\activate
    
    # Install dependencies
    pip install firecrawl-py python-dotenv deepdiff

    Understanding Our Dependencies

    Each dependency serves a specific purpose in our intelligence pipeline.

    • firecrawl-py provides the official Python SDK for Firecrawl’s API, abstracting away the complexity of web scraping and data extraction.
    • python-dotenv manages environment variables securely, ensuring API keys never end up in your codebase.
    • deepdiff offers intelligent comparison of complex data structures, understanding that changing the order of items in a list might not be meaningful while changing their content definitely is.

    Create a .env file for your API key:

    Markdown
    FIRECRAWL_API_KEY=fc-your-api-key-here

    Get your free API key at firecrawl.dev. The free tier provides 500 pages per month, which is plenty for experimentation and learning the system.

    Step 1: Configuration Design

    Let’s start by defining what we want to monitor. This configuration is the brain of our system. It tells our extractor what to look for and how to interpret it. Think of this as programming your research assistant’s knowledge about what matters in competitive intelligence.

    We’re hard-coding in Firecrawl’s pages for the purposes of this demo, but you can of course extend this to dynamically take in other competitor URLs.

    Create config.py:

    Python
    MONITORING_TARGETS = {
        "pricing": {
            "url": "https://firecrawl.dev/pricing",
            "description": "Pricing plans and tiers",
            "extract_schema": {
                "type": "object",
                "properties": {
                    "plans": {
                        "type": "array",
                        "items": {
                            "type": "object",
                            "properties": {
                                "name": {"type": "string"},
                                "price": {"type": "string"},
                                "pages_per_month": {"type": "string"},
                                "features": {"type": "array", "items": {"type": "string"}}
                            }
                        }
                    }
                }
            }
        },
        "blog": {
            "url": "https://firecrawl.dev/blog",
            "description": "Latest blog posts",
            "extract_prompt": "Extract the titles, dates, and summaries of the latest blog posts"
        }
    }

    Design Decision: Schema vs Prompt Extraction

    Notice we’re using two different extraction methods. Each approach serves different competitive intelligence needs and understanding when to use which method is crucial for effective monitoring.

    Schema-based extraction (for the pricing page) works like filling out a standardized form. You define exactly what fields you expect and what types of data they should contain. This approach provides consistent structure across extractions, guarantees specific fields will be present or explicitly null, enables reliable numerical comparisons for metrics like prices, and works best when you know exactly what data structure to expect.

    Prompt-based extraction (for the blog) operates more like asking a smart assistant to summarize what they observe. You describe what you’re looking for in natural language, and the AI adapts to whatever it finds. This approach offers flexibility for varied content, adapts to different page layouts without breaking, handles content that might have varying formats, and uses natural language understanding to capture nuanced information.

    The choice between these methods depends on your competitive intelligence goals. Use schema extraction when you need to track specific metrics over time, compare numerical data across competitors, or ensure consistency for automated analysis. Use prompt extraction when monitoring diverse content types, tracking qualitative changes, or exploring new areas where you’re not sure what data might be valuable.

    Step 2: Building the Data Extraction Engine

    Now let’s build the component that actually fetches our competitive intelligence data. First, we define how we want to store our data:

    Python
    def _setup_database(self):
            """Create database and tables if they don't exist."""
            os.makedirs(os.path.dirname(DATABASE_PATH), exist_ok=True)
    
            conn = sqlite3.connect(DATABASE_PATH)
            cursor = conn.cursor()
    
            cursor.execute('''
                CREATE TABLE IF NOT EXISTS snapshots (
                    id INTEGER PRIMARY KEY AUTOINCREMENT,
                    target_name TEXT NOT NULL,
                    url TEXT NOT NULL,
                    data TEXT NOT NULL,
                    markdown TEXT,
                    extracted_at TIMESTAMP NOT NULL,
                    UNIQUE(target_name, extracted_at)
                )
            ''')
    
            conn.commit()
            conn.close()

    Database Design Philosophy

    The database design prioritizes simplicity for the purposes of this tutorial. SQLite requires zero configuration, creates a portable single-file database, provides sufficient capability for learning and prototyping, and comes built into Python without additional dependencies.

    Our schema intentionally focuses on snapshots rather than normalized relational data. We store both structured data as JSON and raw markdown for maximum flexibility. Timestamps enable historical analysis and trend identification. The unique constraint prevents accidental duplicate snapshots during development.

    This design works well for understanding competitive monitoring concepts and prototyping systems with moderate data volumes. However, it has limitations we’ll address in our production considerations section.

    The Extraction Logic

    Let’s now define the logic to extract data from the targets we set up in our config earlier.

    Python
    def extract_all_targets(self) -> Dict[str, Any]:
            """Extract data from all configured targets."""
            results = {}
            timestamp = datetime.now()
    
            for target_name, target_config in MONITORING_TARGETS.items():
                print(f"Extracting {target_name}...")
    
                try:
                    # Extract data based on configuration (with change tracking enabled)
                    if "extract_schema" in target_config:
                        # Use schema-based extraction
                        response = self.firecrawl.scrape(
                            target_config["url"],
                            formats=[
                                "markdown",
                                {
                                    "type": "json",
                                    "schema": target_config["extract_schema"]
                                }
                            ]
                        )
                        extracted_data = response.get("json", {})
                    elif "extract_prompt" in target_config:
                        # Use prompt-based extraction
                        response = self.firecrawl.scrape(
                            target_config["url"],
                            formats=[
                                "markdown",
                                {
                                    "type": "json",
                                    "prompt": target_config["extract_prompt"]
                                }
                            ]
                        )
                        extracted_data = response.get("json", {})
                    else:
                        # Just get markdown
                        response = self.firecrawl.scrape(
                            target_config["url"],
                            formats=["markdown"]
                        )
                        extracted_data = {}
    
                    markdown_content = response.get("markdown", "")
    
                    # Store in results
                    results[target_name] = {
                        "url": target_config["url"],
                        "data": extracted_data,
                        "markdown": markdown_content,
                        "extracted_at": timestamp.isoformat()
                    }
    
                    # Save to database
                    self._save_snapshot(
                        target_name,
                        target_config["url"],
                        extracted_data,
                        markdown_content,
                        timestamp
                    )
    
                    print(f"✓ Extracted {target_name}")
    
                except Exception as e:
                    print(f"✗ Error extracting {target_name}: {str(e)}")
                    results[target_name] = {
                        "url": target_config["url"],
                        "error": str(e),
                        "extracted_at": timestamp.isoformat()
                    }
    
            return results

    Key Design Patterns for Reliable Extraction

    The extraction logic implements several patterns that make the system robust for real-world use.

    • Graceful degradation ensures that if one target fails to extract, monitoring continues for other targets. This prevents a single problematic website from breaking your entire competitive intelligence pipeline.
    • Multiple format extraction captures both structured data and clean markdown text. The structured data enables automated analysis and comparison, while the markdown provides human-readable context and serves as a backup when structured extraction encounters unexpected page layouts.
    • Consistent timestamps ensure all targets in a single monitoring run share the same timestamp, creating coherent snapshots for historical analysis. This prevents timing discrepancies that could confuse change detection.
    • Error context preservation stores error information for debugging without crashing the system. This helps you understand why specific extractions fail and improve your monitoring configuration over time.

    Understanding Firecrawl’s Response

    When Firecrawl processes a page, it returns:

    Python
    {
        "markdown": "# Clean markdown of the page...",
        "extract": {
            # Your structured data based on schema/prompt
        },
        "metadata": {
            "title": "Page title",
            "statusCode": 200,
            # ... other metadata
        }
    }

    The markdown output represents the page content cleaned of navigation elements, advertisements, and other visual clutter. This is what makes Firecrawl superior to basic HTML scraping, you get the actual content without the noise. The extract field contains your structured data, formatted according to your schema or prompt. The metadata provides technical details about the extraction process.

    Step 3: Intelligent Change Detection

    Change detection is where our system provides real value. The goal is to understand which differences matter for competitive decision making.

    Python
    from deepdiff import DeepDiff
    
    class ChangeDetector:
        def detect_changes(self, current, previous):
            """
            Compare current snapshot with previous snapshot.
    
            This is where the magic happens - DeepDiff intelligently
            compares nested structures and gives us actionable insights.
            """
            if not previous:
                # First run - establish baseline
                return {
                    "is_first_run": True,
                    "message": "First extraction - no previous data to compare",
                    "current_data": current
                }
    
            changes = {
                "is_first_run": False,
                "changes_detected": False,
                "summary": [],
                "details": {}
            }
    
            # Compare structured data if available
            if current.get("data") and previous.get("data"):
                data_diff = DeepDiff(
                    previous["data"],
                    current["data"],
                    ignore_order=True,  # Order changes aren't usually significant
                    verbose_level=2,    # Get detailed change information
                    exclude_paths=["root['timestamp']"]  # Ignore expected changes
                )
    
                if data_diff:
                    changes["changes_detected"] = True
                    changes["details"]["data_changes"] = self._parse_deepdiff(data_diff)
    
            # Also check for significant content changes
            if current.get("markdown") and previous.get("markdown"):
                current_len = len(current["markdown"])
                previous_len = len(previous["markdown"])
    
                # Threshold of 100 chars filters out minor changes
                if abs(current_len - previous_len) > 100:
                    changes["changes_detected"] = True
                    changes["details"]["content_change"] = {
                        "previous_length": previous_len,
                        "current_length": current_len,
                        "difference": current_len - previous_len
                    }
    
            return changes

    Why DeepDiff?

    Firecrawl does have a built-in change detection feature but it’s still in beta and I didn’t want to take the risk of trying something new with my client. I might update this in the future after I’ve tried it out but for now DeepDiff is a good, free alternative.

    It understands the semantic meaning of differences rather than just identifying that something changed. So instead of flagging every tiny modification, creating noise that obscures important signals, it:

    • Handles Nested Structures: Pricing plans often have nested features, tiers, etc.
    • Ignores Irrelevant Changes: Array order changes don’t trigger false positives
    • Provides Change Context: Tells us not just what changed, but where in the structure
    • Makes Type-Aware Comparison: Knows that the string “100” and the integer 100 might represent the same value in different contexts

    Parsing DeepDiff Output

    DeepDiff returns changes in categories that we need to interpret and parse:

    • values_changed: Modified values (price changes, text updates)
    • iterable_item_added: New items in lists (new features, plans)
    • iterable_item_removed: Removed items (discontinued features)
    • dictionary_item_added: New fields (new data points)
    • dictionary_item_removed: Removed fields (deprecated info)
    Python
    def _parse_deepdiff(self, diff):
        parsed = {}
    
        # Value modifications - most common and important
        if "values_changed" in diff:
            parsed["modified"] = []
            for path, change in diff["values_changed"].items():
                parsed["modified"].append({
                    "path": self._clean_path(path),
                    "old_value": change["old_value"],
                    "new_value": change["new_value"]
                })
    
        # New items - often indicates new features or products
        if "iterable_item_added" in diff:
            parsed["added"] = []
            for path, value in diff["iterable_item_added"].items():
                parsed["added"].append({
                    "path": self._clean_path(path),
                    "value": value
                })
    
        # Removed items - could indicate discontinued offerings
        if "iterable_item_removed" in diff:
            parsed["removed"] = []
            for path, value in diff["iterable_item_removed"].items():
                parsed["removed"].append({
                    "path": self._clean_path(path),
                    "value": value
                })
    
        return parsed
    
    def _clean_path(self, path):
        """
        Convert DeepDiff's technical paths to readable descriptions.
    
        Example: "root['plans'][2]['price']" becomes "plans.2.price"
        """
        path = path.replace("root", "")
        path = path.replace("[", ".").replace("]", "")
        path = path.replace("'", "")
        return path.strip(".")

    The Importance of Thresholds

    Notice the 100-character threshold for content changes. This is intentional because not all changes are worth acting on. Small modifications like fixing typos or adjusting formatting create noise that distracts from meaningful signals. Significant changes like new sections, removed features, or substantial content additions indicate strategic shifts worth investigating.

    Setting appropriate thresholds requires understanding your competitive landscape. In fast-moving markets, you might want lower thresholds to catch early signals. In stable industries, higher thresholds prevent alert fatigue from minor updates.

    Step 4: Creating Actionable Reports

    While our change detection system identifies what’s different, the reporter system explains what those differences mean for your competitive position and what actions you should consider taking.

    All we’re doing here is sending the information we’ve gathered to OpenAI (or the LLM of your choice) to turn into a report. On our first run, we ask it to generate a baseline of our competitor and then on subsequent runs we ask it to analyze the diffs within that context and produce an actionable report.

    Most of this is just prompt engineering. Here are some basic prompts you can start with, but feel free to tweak it for your use case:

    Python
    system_prompt = """You are a competitive intelligence analyst. Your job is to analyze competitor data and changes, then generate actionable business insights.
    
    Given competitor monitoring data with DETECTED CHANGES, create a professional markdown report that includes:
    
    1. **Executive Summary** - High-level insights and key takeaways
    2. **Critical Changes** - Most important changes that require immediate attention
    3. **Strategic Implications** - What these changes mean for competitive positioning
    4. **Recommended Actions** - Specific steps the business should consider
    5. **Market Intelligence** - Broader patterns and trends observed
    
    Focus on business impact, not technical details. Be concise but insightful. Use markdown formatting with appropriate headers and bullet points."""
    
    user_prompt = f"""Analyze this competitor monitoring data and generate a competitive intelligence report focused on CHANGES DETECTED:
    
    **Date:** {timestamp.strftime('%B %d, %Y')}
    
    **Data Overview:**
    - Targets monitored: {len(analysis_data['targets_analyzed'])}
    - Changes detected: {analysis_data['changes_detected']}
    
    **Detailed Data with Changes:**
    ```json
    {json.dumps(analysis_data, indent=2, default=str)}
    ```
    Please generate a professional competitive intelligence report based on the changes detected. Focus on actionable business insights rather than technical details."""
    

    Running the System

    And those are our four components! As I mentioned earlier, I’m building this as part of a larger system for my client, so we have this set up to run automatically at regular intervals and aside from generating a report (which gets posted to slack automatically) it also updates other competitive positioning material like landing pages and sales enablement content.

    But for the purposes of this demo, we can run this manually in the command line. Create a main.py file to orchestrate the full system:

    Python
    def main():
        """Main execution function."""
        print("=" * 60)
        print("Competitor Research Automation with Firecrawl")
        print("=" * 60)
    
        # Load environment variables
        load_dotenv()
        api_key = os.getenv("FIRECRAWL_API_KEY")
    
        if not api_key:
            print("\nError: FIRECRAWL_API_KEY not found in environment variables")
            print("Please set your API key in a .env file or as an environment variable")
            print("Example: export FIRECRAWL_API_KEY='fc-your-key-here'")
            sys.exit(1)
    
        print(f"\nRun started at: {datetime.now().strftime('%Y-%m-%d %H:%M:%S')}")
        print(f"Monitoring {len(MONITORING_TARGETS)} targets\n")
    
        # Initialize components
        extractor = CompetitorExtractor(api_key)
        detector = ChangeDetector()
        reporter = AIReporter()
    
        # Extract current data
        print("Extracting current data from targets...\n")
        current_results = extractor.extract_all_targets()
    
        # Get previous snapshots for comparison
        previous_snapshots = {}
        for target_name in MONITORING_TARGETS.keys():
            previous = extractor.get_previous_snapshot(target_name)
            if previous:
                previous_snapshots[target_name] = previous
    
        # Detect changes
        print("\nAnalyzing changes...")
        all_changes = detector.detect_all_changes(current_results, previous_snapshots)
    
        # Generate summary
        change_summary = detector.summarize_changes(all_changes)
    
        # Display summary in console
        print("\nSummary of Changes:")
        print("-" * 40)
        if change_summary:
            for summary_item in change_summary:
                print(summary_item)
        else:
            print("No targets monitored yet.")
    
        # Generate report
        print("\nGenerating report...")
        report_path = reporter.generate_report(current_results, all_changes, change_summary)
    
        # Final status
        print("\n" + "=" * 60)
        print("Monitoring Complete!")
        print(f"Report saved to: {report_path}")
    
        # Check if this is the first run
        if all([changes.get("is_first_run") for changes in all_changes["targets"].values()]):
            print("\nThis was the first run - baseline data has been captured.")
            print("   Run the script again later to detect changes!")
    
        print("=" * 60)

    The initial run serves as the foundation for all future competitive analysis. During this run, the system captures baseline data for each target, establishes the data structure for comparison, creates the storage schema, and validates that extraction works correctly for your chosen targets.

    After establishing your baseline, subsequent runs focus on identifying and analyzing changes that inform competitive strategy.

    Production Considerations: Understanding System Limitations

    While this tutorial creates a functional competitive monitoring system, it’s designed for demonstration and learning rather than enterprise deployment. Understanding these limitations helps you recognize when and how to evolve the system for production use.

    Database and Storage Limitations

    The SQLite database provides excellent simplicity for learning and prototyping, but it has constraints that affect production scalability. SQLite handles concurrent reads well but struggles with concurrent writes, making it unsuitable for systems that need to extract data from multiple sources simultaneously. The single-file design makes backup and replication more complex than necessary for critical business systems.

    For production systems, consider PostgreSQL or MySQL for better concurrency handling and enterprise features. Cloud databases like AWS RDS or Google Cloud SQL provide managed infrastructure, automated backups, and scaling capabilities.

    API Rate Limiting and Cost Management

    The current system makes API calls sequentially without sophisticated rate limiting or cost optimization. Firecrawl’s pricing scales with usage, so uncontrolled extraction could become expensive quickly. The system doesn’t implement intelligent scheduling based on page change frequency, meaning it might waste API calls on static content.

    Production systems should implement adaptive scheduling that checks high-priority targets more frequently, uses exponential backoff for rate limiting, implements cost monitoring and alerts, and caches results when appropriate to reduce redundant API calls.

    Error Recovery and Resilience

    The current error handling is basic and suitable for development but insufficient for production reliability. Network failures, API timeouts, and parsing errors need more sophisticated handling. The system doesn’t implement retry logic with exponential backoff or distinguish between temporary and permanent failures.

    Production systems require comprehensive logging for debugging and monitoring, retry mechanisms for transient failures, circuit breakers to prevent cascading failures, and health checks to monitor system status.

    Data Quality and Validation

    The tutorial system assumes extracted data is reliable and correctly formatted, but real-world web scraping encounters many data quality issues. Websites change their structure, introduce temporary errors, or modify content in ways that break extraction logic.

    Production systems need data validation pipelines that verify extracted data meets expected formats, detect and handle parsing failures gracefully, implement data quality scoring to identify unreliable extractions, and provide alerts when data quality degrades.

    Customizing and Extending The System

    I’ve only shown you the core functionality of scraping competitors and identifying changes. With this in place as your foundation, there’s a lot you can do to turn this into a powerful competitive intelligence system for your company:

    • Alerting system: Integrate with Slack or email to send out notifications to differerent people or teams in your organization based on the type of change.
    • Track patterns: Extend the system to track changes over longer periods of time and see patterns.
    • Add more data sources: Scrape their ads, social media, and other properties for more insights into their GTM and positioning.
    • Integrate with BI: incorporate competitive data into executive dashboards, combine it with internal metrics, and support strategic planning processes
    • Multi-competitor dashboards: Instead of just generating reports, you can create an interactive dashboard to visualize changes.
    • Auto-update your assets: As I’m doing with my client, you can automatically update your competitive positioning assets like landing pages if there’s a significant product or pricing update.

    Conclusion: From Monitoring to Intelligence

    With tools like Firecrawl, we can abstract away the scraping and monitoring infrastructure and focus on building out an actual intelligence system that suggests and even takes actions for us.

    Firecrawl also has a dashboard where you can experiment with the different scraping options and see what comes back. Give it a try and implement the code in your app.

    And if you want more tutorials on building useful AI agents, sign up below.

    Want to build your own AI agents?

    Sign up for my newsletter covering everything from the tools, APIs, and frameworks you need, to building and serving your own multi-step AI agents.

  • How People Really Use ChatGPT, and What It means for Businesses

    How People Really Use ChatGPT, and What It means for Businesses

    Every week, 700 million people fire up ChatGPT and send more than 18 billion messages. That’s about 10% of the world’s adults, collectively talking to a chatbot at a rate of 29,000 messages per second.

    The question is: what on earth are they talking about?

    OpenAI and a team of economists recently released a fascinating paper that digs into exactly that. It’s the first time we’ve seen a systematic breakdown of how people actually use ChatGPT in the wild.

    There’s one important caveat though: the study only looks at consumer accounts (Free, Plus, and Pro). No Teams, no Enterprise, no API. That means all the numbers you’re about to see skew toward personal usage rather than business use.

    But even with that limitation, the trends are clear. And when you combine the consumer data with what we know about enterprise usage, a bigger story emerges about how AI is reshaping both work and daily life.

    Work vs. Non-Work: AI Moves Into Daily Life

    In mid-2024, about half of consumer ChatGPT messages were work-related. Fast forward a year and non-work usage dominates. 73% of messages are about personal life, curiosity, or hobbies.

    Some of this is skew: Enterprise data isn’t in here, and yes, plenty of serious work happens on corporate accounts. But I don’t think that fully explains it. There is a real trend of people bringing ChatGPT into their everyday lives.

    That tracks with my own journey. Back in 2020, when I first used the GPT-3 API, it was strictly work. I was building a startup on top of it back then so it was all about product development, copywriting, business experiments.

    When ChatGPT launched, I still had a “work-only” account. Over time, I started asking it for personal things too. Today? I’m about 50-50. And that’s exactly what the data shows at scale.

    The paper also shows that each cohort of users increases their usage over time. Early adopters send more messages than newer ones, but even the new cohorts ramp up the longer they stick around.

    That also reflects my personal experience. The more I played with ChatGPT, the more I discovered new ways to use it, from drafting a proposal to planning a weekend trip. It went from a tool I used for certain activities to something I turn to almost immediately for any activity.

    The Big Three Use Cases

    When you zoom out, almost 80% of all usage falls into three buckets:

    1. Practical Guidance (29%): tutoring, how-to advice, creative ideation.
    2. Seeking Information (24%, up from 14%): essentially, ChatGPT-search.
    3. Writing (24%, down from 36%): drafting, editing, translating, summarizing.

    What’s fascinating here is the growth of seeking information. The move from Google to ChatGPT is real. People are asking it for information, advice, even recommendations for specific products. Personally, I’ve used it for everything from planning a trip to Barcelona to asking why so many Japanese restaurants feature a waving maneki-neko cat statue.

    There’s also a very big opportunity here in the education space. If we break it down further, 10.2% of all ChatGPT messages are tutoring and teaching requests. That’s one in every ten conversations, making ChatGPT one of the world’s largest educational platforms.

    Now, when you look at work-related queries only, writing is still king: 40% of all work-related usage is writing. And that makes sense. Everyone deals with emails and business communications.

    Interestingly, two-thirds of writing requests are edits to user-provided text (“improve this email”) rather than net-new generation (“write a blog post for me”). AI is acting more as a co-writer and editor than a ghostwriter.

    Where’s Coding?

    One surprise: only 4.2% of consumer ChatGPT usage is programming-related. Compare that to Claude, where 30%+ of conversations are coding.

    But that doesn’t mean coding with AI isn’t happening. It’s just happening elsewhere (in the API, in GitHub Copilot, in Cursor, in Claude Code). Developers don’t want to pop into a chatbot window; they want AI integrated into their IDEs and workflows.

    So the consumer product underrepresents coding’s real importance.

    Self-Expression: Smaller Than Expected

    Another surprise: “self-expression” (role play, relationships, therapy-like use) is only 4.3% of usage. That’s far smaller than some surveys had suggested.

    Part of me wonders if some of these conversations were misclassified. But if the data’s accurate, I’m actually glad. We already know AI has a sycophancy problem. The last thing we need is people turning it into their therapist en masse.

    Further on in the research, there’s more evidence to indicate this: self-expression had the highest satisfaction scores of any category. The good-to-bad ratio was almost 8:1, way higher than writing or coding. People seem happiest when using it for therapy.

    Asking vs. Doing

    The researchers also classified queries into three intents:

    • Asking: seeking info or advice (“What’s a good health plan?”).
    • Doing: asking ChatGPT to produce an output (“Rewrite this email”).
    • Expressing: sharing feelings or views (“I’m feeling stressed”).

    Across consumer usage:

    • 49% Asking
    • 40% Doing
    • 11% Expressing

    Here’s what’s interesting: Asking is growing faster than Doing, and Asking gets higher satisfaction.

    Why? Because asking for advice or information is pretty straightforward. There’s not a lot that can go wrong if you ask the AI what the capital of Canada is.

    But when people ask ChatGPT to do something, they often don’t provide enough context for a great output. In writing, for example, “write me a blog post on fitness” usually gives you generic AI slop. Having worked with multiple companies and trained professionals on how to use ChatGPT, I often see them try to get an output without adding any context or prompting the AI well.

    But, as models get better at handling sparse instructions, and as people get better at prompting, Doing will likely grow. Especially with OpenAI layering on more agentic capabilities. Today, ChatGPT is an advisor. Tomorrow, it will be a doer too.

    Who’s Using ChatGPT?

    Some demographic shifts worth noting:

    • Age: Nearly half of usage comes from people under 26.
    • Gender: Early adopters were 80% male; now, usage is slightly female-majority.
    • Geography: Fastest growth is in low- and middle-income countries.
    • Education/Occupation: More educated professionals use it for work; managers lean on it for writing, technical users for debugging/problem-solving.

    That international growth story is remarkable. We’re witnessing the birth of the first truly global intelligence amplification tool. A software developer in Lagos now has access to the same AI coding assistant as someone in San Francisco.

    For businesses, this matters. Tomorrow’s workforce is AI-native, global, and diverse. Employees (and customers) are going to bring consumer AI habits into the workplace whether enterprises are ready or not.

    ChatGPT as Decision Support

    When you look at work-related usage specifically, the majority of queries cluster around two functions:

    1. Obtaining, documenting, and interpreting information
    2. Making decisions, giving advice, solving problems, and thinking creatively

    This is the essence of decision support. And in my consulting work, it’s where I see the biggest ROI. Companies want automation, but the biggest unlock is AI that helps people make smarter, faster decisions.

    The Big Picture

    So what does all this tell us?

    For consumers: ChatGPT is increasingly a part of daily life, not just work.

    For businesses: Don’t just track “what consumers are doing with AI.” Track how those habits bleed into the workplace. Adoption starts at home, then shows up in the office.

    For the future: AI at work will center on decision support, not pure automation. The companies that understand this earliest will unlock the most value.

    The intelligence revolution is already here, 29,000 messages per second at a time. The question is whether your organization is ready for what comes next.

  • Mastering AI Coding: The Universal Playbook of Tips, Tricks, and Patterns

    Mastering AI Coding: The Universal Playbook of Tips, Tricks, and Patterns

    I’ve spent the last year deep in the trenches with every major AI coding tool. I’ve built everything from simple MVPs to complex agents, and if there’s one thing I’ve learned, it’s that the tools change, but the patterns remain consistent.

    I’ve already written deep-dive guides on some of these tools – Claude Code, Amp Code, Cursor, and even a Vibe Coding manifesto.

    So this post is the meta-playbook, the “director’s cut”, if you will. Everything I’ve learned about coding with AI, distilled into timeless principles you can apply across any tool, agent, or IDE.

    Pattern 1: Document Everything

    AI coding tools are only as good as the context you feed them. If you and I asked ChatGPT to suggest things to do in Spain, we’ll get different answers because it has different context about each of us.

    So before you even start working with coding agents, you need to ensure you’ve got the right context.

    1. Project Documentation as Your AI’s Brain

    Every successful AI coding project starts with documentation that acts as your AI’s external memory. Whether you’re using Cursor’s .cursorrules, Claude Code’s CLAUDE.md, or Amp’s Agents.md, the pattern is identical:

    • Project overview and goals – What are you building and why?
    • Architecture decisions – How is the codebase structured?
    • Coding conventions – What patterns does your team follow?
    • Current priorities – What features are you working on?

    Pro Tip: Ask your AI to generate this documentation first, then iterate on it. It’s like having your AI interview itself about your project.

    2. The Selective Context Strategy

    Most people either give the AI zero context (and get code slop) or dump their entire codebase into the context window (and overwhelm the poor thing).

    The sweet spot? Surgical precision.

    Markdown
    Bad Context: "Here's my entire React app, fix the bug"
    Good Context: "This authentication component (attached) is throwing errors when users log in. Here's the error message and the auth service it calls. Fix the login flow."

    3. The Living Documentation Pattern

    Your AI context isn’t set-it-and-forget-it. Treat it like a living document that evolves with your project. After major features or architectural changes, spend 5 minutes updating your context files.

    Think of it like this: if you hired a new developer, what would they need to know to be productive? That’s exactly what your AI needs.

    Pattern 2: Planning Before Code

    When you jump straight into coding mode, you’re essentially asking your AI to be both the architect and the construction worker… at the same time. It might work for a treehouse but not a mansion.

    Step 1: Start with a conversation, not code. Whether you’re in Cursor’s chat, Claude Code’s planning mode, or having a dialogue with Amp, begin with:

    Markdown
    "I want to build [basic idea]. Help me flesh this out by asking questions about requirements, user flows, and technical constraints."

    The AI will ping-pong with you, asking clarifying questions that help you think through edge cases you hadn’t considered.

    Step 2: Once requirements are solid, get architectural:

    Markdown
    "Based on these requirements, suggest a technical architecture. Consider:
    - Database schema and relationships
    - API structure and endpoints
    - Frontend component hierarchy
    - Third-party integrations needed
    - Potential scaling bottlenecks"

    Step 3: Once we’ve sorted out the big picture, we can get into the details. Ask your AI:

    Markdown
    "Break this down into MVP features vs. nice-to-have features. What's the smallest version that would actually be useful?"

    The Feature Planning Framework

    For each feature, follow this pattern:

    1. User story definition – What does the user want to accomplish?
    2. Technical breakdown – What components, APIs, and data models are needed?
    3. Testing strategy – How will you know it works?
    4. Integration points – How does this connect to existing code?

    Save these plans as markdown files. Your AI can reference them throughout development, keeping you on track when scope creep tries to derail your focus.

    Pattern 3: Incremental Development

    Building in small, testable chunks, is good software engineering practice. Instead of building the whole MVP in one shot, break off small chunks and work on that with the AI in separate conversations.

    The Conversation Management Pattern

    Every AI coding tool has context limits. Even the ones with massive context windows get confused when conversations become novels. Here’s the universal pattern:

    Short Conversations for Focused Features

    • One conversation = one feature or one bug fix
    • When switching contexts, start a new conversation
    • If a conversation hits 50+ exchanges, consider starting fresh

    When starting a new conversation, give your AI a briefing:

    Markdown
    "I'm working on the user authentication feature for our React app. 
    Previous context: We have a Node.js backend with JWT tokens and a React frontend.
    Current task: Implement password reset functionality.
    Relevant files: auth.js, UserController.js, and Login.component.jsx"
    

    The Test-Driven AI Workflow

    This is the secret sauce that separates the pros from the wannabes. Instead of asking for code directly, ask for tests first:

    Markdown
    "Write tests for a password reset feature that:
    1. Sends reset emails
    2. Validates reset tokens
    3. Updates passwords securely
    4. Handles edge cases (expired tokens, invalid emails, etc.)"
    

    Why this works:

    • Tests force you to think through requirements
    • AI-generated tests catch requirements you missed
    • You can verify the tests make sense before implementing
    • When implementation inevitably breaks, you have a safety net

    The Iterative Refinement Strategy

    Don’t expect perfection on the first try. The best AI-assisted development follows this loop:

    1. Generate – Ask for initial implementation
    2. Test – Run the code and identify issues
    3. Refine – Provide specific feedback about what’s broken
    4. Repeat – Until it works as expected
    Markdown
    "The login function you generated works, but it's not handling network errors gracefully. Add proper error handling with user-friendly messages and retry logic."
    

    Pattern 4: Always Use Version Control

    When you’re iterating fast with AI coding, the safest, sanest way to move is to create a new branch for every little feature, fix, or experiment. It keeps your diffs tiny, and creates multiple checkpoints that you can roll back to when something goes wrong.

    The Branch-Per-Feature Philosophy

    Just like you should start a new chat for every feature, make it a habit to also create a new git branch. With Claude Code you can create a custom slash command that starts a new chat and also creates a new branch at the same time.

    Here’s why this matters more with AI than traditional coding:

    • AI generates code in bursts. When Claude Code or Cursor spits out 200 lines of code in 30 seconds, you need a clean way to isolate and evaluate that change before it touches your main branch.
    • Experimentation becomes frictionless. Want to try two different approaches to the same problem? Spin up two branches and let different AI instances work on each approach. Compare the results, keep the winner, delete the loser.
    • Rollbacks are inevitable. That beautiful authentication system your AI built? It might work perfectly until you discover it breaks your existing user flow. With proper branching, rollback is one command instead of hours of manual cleanup.

    Test Before You Commit

    Just like your dating strategy, you want to test your code before you actually commit it. Ask the AI to run tests, see if it builds correctly, and try your app on your localhost.

    Commit code only when you are completely satisfied that everything is in order. See more on testing in Pattern 7.

    Oh and just so you know, code that works on your development environment may not work on production. I recently ran into an issue where my app was loading blazingly fast on my local dev environment, but when I deployed it to the cloud it took ages to load.

    I asked my AI to identify it and it looked through my commit history to isolate that it was because we added more data to our DB, which is fast locally but takes time in production. Which brings me to…

    The Commit Message Strategy for AI Code

    Your commit messages become crucial documentation when working with AI. Future you (and your team) need to know:

    Bad commit message:

    Markdown
    Add dashboard

    Good commit message:

    Markdown
    Implement user dashboard with analytics widgets
    
    - Created DashboardComponent with React hooks
    - Added API integration for user stats
    - Responsive grid layout with CSS Grid
    - Generated with Cursor AI, manually reviewed for security
    - Tested with sample data, needs real API integration
    
    Co-authored-by: AI Assistant

    This tells the story: what was built, how it was built, what still needs work, and acknowledges AI involvement.

    Version Control as AI Training Data

    Your git history becomes a training dataset for your future AI collaborations. Clean, descriptive commits help you give better context to AI tools:

    “I’m working on the user authentication system. Here’s the git history of how we built our current auth (git log –oneline auth/). Build upon this pattern for the new OAuth integration.”

    The better your git hygiene, the better context you can provide to AI tools for future development.

    Pattern 5: Review Code Constantly

    AI can generate code faster than you can blink, but it can also generate technical debt at light speed. The developers who maintain clean codebases with AI assistance have developed quality control reflexes that activate before anything gets committed.

    The AI Code Review Checklist

    Before accepting any AI-generated code, run through this mental checklist:

    Functionality Review:

    • Does this actually solve the problem I described?
    • Are there edge cases the AI missed?
    • Does the logic make sense for our specific use case?

    Integration Review:

    • Does this follow our existing patterns and conventions?
    • Will this break existing functionality?
    • Are the imports and dependencies correct?

    Security Review:

    • Are there any obvious security vulnerabilities?
    • Is user input being validated and sanitized?
    • Are secrets and sensitive data handled properly?

    Performance Review:

    • Are there any obvious performance bottlenecks?
    • Is this approach scalable for our expected usage?
    • Are expensive operations being cached or optimized?

    The Explanation Demand Strategy

    Never accept code you don’t understand. Make it a habit to ask:

    Markdown
    "Explain the approach you took here. Why did you choose this pattern over alternatives? What are the trade-offs?"

    This serves two purposes:

    1. You learn something new (AI often suggests patterns you wouldn’t have thought of)
    2. You catch cases where the AI made suboptimal choices

    The Regression Prevention Protocol

    AI is fantastic at implementing features but terrible at understanding the broader impact of changes. Develop these habits:

    • Commit frequently – Small, atomic commits make it easy to rollback when AI breaks something (see previous section).
    • Run tests after every significant change – Don’t let broken tests pile up
    • Use meaningful commit messages – Your future self will thank you when debugging

    Pattern 6: Handling Multiple AI Instances

    As your projects grow in complexity, you’ll hit scenarios where you need more sophisticated coordination.

    The Parallel Development Pattern

    For complex features, run multiple AI instances focusing on different aspects:

    • Instance 1: Frontend components and user interface
    • Instance 2: Backend API endpoints and database logic
    • Instance 3: Testing, debugging, and integration

    Each instance maintains its own conversation context, preventing the confusion that happens when one AI tries to juggle multiple concerns.

    The Specialized Agent Strategy

    Different AI tools excel at different tasks:

    • Code generation: Claude Code or Amp for rapid prototyping and building features
    • Debugging and troubleshooting: Cursor or GitHub Copilot for inline suggestions
    • Architecture and planning: Claude or Gemini for high-level thinking
    • Testing and quality assurance: Specialized subagents or custom prompts

    The Cross-Tool Context Management

    When working across multiple tools, maintain consistency with shared documentation:

    • Keep architecture diagrams and requirements in a shared location
    • Use consistent naming conventions and coding standards
    • Document decisions and changes in a central wiki or markdown files

    Pattern 7: Debugging and Problem-Solving

    The Universal Debugging Mindset

    AI-generated code will break. Not if, when. The developers who handle this gracefully have internalized debugging patterns that work regardless of which AI tool they’re using.

    The Systematic Error Resolution Framework

    Step 1: Isolate the Problem Don’t dump a wall of error text and hope for magic. Instead:

    Markdown
    "I'm getting this specific error: [exact error message]
    This happens when: [specific user action or condition]
    Expected behavior: [what should happen instead]
    Relevant code: [only the functions/components involved]"

    Step 2: Add Debugging Infrastructure Ask your AI to add logging and debugging information:

    Markdown
    "Add console.log statements to track the data flow through this function. I need to see what's actually happening vs. what should be happening."

    Step 3: Test Hypotheses Methodically Work with your AI to form and test specific hypotheses:

    Markdown
    "I think the issue might be with async timing. Let's add await statements and see if that fixes the race condition."

    The Fallback Strategy Pattern

    When your AI gets stuck in a loop (trying the same failed solution repeatedly), break the cycle:

    1. Stop the current conversation
    2. Start fresh with better context
    3. Try a different approach or tool
    4. Simplify the problem scope

    The Human Override Protocol

    Sometimes you need to step in and solve things manually. Recognize these situations:

    • AI keeps suggesting the same broken solution
    • The problem requires domain knowledge the AI doesn’t have
    • You’re dealing with legacy code or unusual constraints
    • Time pressure makes manual fixes more efficient

    Pattern 8: Scaling and Maintenance

    Building with AI is easy. Maintaining and scaling AI-generated code? That’s where many projects die. The successful long-term practitioners have developed sustainable approaches.

    The Documentation Discipline

    As your AI-assisted codebase grows, documentation becomes critical:

    • Decision logs – Why did you choose certain approaches?
    • Pattern libraries – What conventions emerged from your AI collaboration?
    • Gotcha lists – What quirks and limitations did you discover?
    • Onboarding guides – How do new team members get productive quickly?

    The Refactoring Rhythm

    Schedule regular refactoring sessions where you:

    • Clean up AI-generated code that works but isn’t optimal
    • Consolidate duplicate patterns
    • Update documentation and context files
    • Identify technical debt before it becomes problematic

    The Knowledge Transfer Strategy

    Don’t become the only person who understands your AI-generated codebase:

    • Share your prompting strategies with the team
    • Document your AI tool configurations and workflows
    • Create reusable templates and patterns
    • Train other team members on effective AI collaboration

    Pattern 9: Mindset and Workflow

    Reframing Your Relationship with AI

    The most successful AI-assisted developers have fundamentally reframed how they think about their relationship with AI tools. Think of your role as:

    • An editor: curating drafts, not creating everything from scratch.
    • A director: guiding talented actors (the AIs) through each scene.
    • A PM: breaking down the problem into tickets.

    The Collaborative Mindset Shift

    From “AI will do everything” to “AI will accelerate everything”

    AI isn’t going to architect your application or make strategic decisions. But it will implement your ideas faster than you thought possible, generate boilerplate you’d rather not write, and catch errors you might have missed.

    The Prompt Engineering Philosophy

    Good prompt engineering isn’t about finding magic words that unlock AI potential. It’s about clear communication and precise requirements, skills that make you a better developer overall.

    The Specificity Principle: Vague prompts get vague results. Specific prompts get specific results.

    Markdown
    Vague: "Make this component better"
    Specific: "Optimize this React component by memoizing expensive calculations, adding proper error boundaries, and implementing loading states for async operations"

    The Iterative Improvement Loop

    Embrace the fact that AI development is a conversation, not a command sequence:

    1. Express intent clearly
    2. Review and test the output
    3. Provide specific feedback
    4. Iterate until satisfied

    This is how all good software development works, just at AI speed.

    The Real-World Implementation Guide

    Week 1: Foundation Setup

    • Choose your primary AI coding tool and set up proper context files
    • Create a simple project to practice basic patterns
    • Establish your documentation and workflow habits

    Week 2: Development Flow Mastery

    • Practice the test-driven AI workflow on real features
    • Experiment with conversation management strategies
    • Build your code review and quality control reflexes

    Week 3: Advanced Techniques

    • Try multi-instance development for complex features
    • Experiment with different tools for different tasks
    • Develop your debugging and problem-solving workflows

    Week 4: Scale and Optimize

    • Refactor and clean up your AI-generated codebase
    • Document your learned patterns and approaches
    • Share knowledge with your team

    AI Coding is Human Amplification

    To all the vibe coders out there: AI coding tools don’t replace good development practices, but they do make good practices more important.

    The developers thriving in this new landscape aren’t the ones with the best prompts or the latest tools. They’re the ones who understand software architecture, can communicate requirements clearly, and have developed the discipline to maintain quality at AI speed.

    Your AI assistant will happily generate 500 lines of code in 30 seconds. Whether that code is a masterpiece or a maintenance nightmare depends entirely on the human guiding the process.

    So here’s my challenge to you: Don’t just learn to use AI coding tools. Learn to direct them. Be the architect, let AI be the construction crew, and together you’ll build things that neither humans nor AI could create alone.

    The age of AI-assisted development isn’t coming—it’s here. The question isn’t whether you’ll use these tools, but whether you’ll master them before they become table stakes for every developer.

    Now stop reading guides and go build something amazing. Your AI assistant is waiting.

    Ready to Level Up Your AI Coding Game?

    This guide barely scratches the surface of what’s possible when you truly master AI-assisted development. Want to dive deeper into specific tools, advanced techniques, and real-world case studies?

    What’s your biggest AI coding challenge right now? Contact me and let’s solve it together. Whether you’re struggling with context management, debugging AI-generated code, or scaling your workflows, I’ve probably been there.

    And if this guide helped you level up your AI coding game, share it with a fellow developer who’s still fighting with their AI instead of collaborating with it.

    Want to build your own AI agents?

    Sign up for my newsletter covering everything from the tools, APIs, and frameworks you need, to building and serving your own multi-step AI agents.

  • Diving into Amp Code: A QuickStart Guide

    Diving into Amp Code: A QuickStart Guide

    I first tried out Amp Code a few months ago around the same time I started getting into Claude Code. Claude had just announced a feature where I could use my existing monthly subscription instead of paying for extra API costs, so I didn’t give Amp a fair shake.

    Over the last couple of weeks, I’ve been hearing more about Amp, and Claude Code has felt a bit… not-so-magical. So I decided to give it a real shot again, and I have to say, I am extremely impressed.

    In this guide, we’re going to cover what make Amp different, and how to get the most out of it. As someone who has used every vibe coding tool, app, agent, CLI, what have you, I’ve developed certain patterns for working with AI coding. I’ve covered these patterns many times before on my blog, so I’ll focus on just the Amp stuff in this one.

    installation and setup

    Amp has integrations with all IDEs but I prefer the CLI, so that’s what I’ll be using here. Install it globally, navigate to your project directory, and start running it.

    Bash
    npm install -g @sourcegraph/amp
    amp

    If you’re new to Amp, you’ll need to create an account and it should come with $10 in free credits (at least it did for me when I first signed up).

    Once that’s done, you’ll see this beautiful screen.

    As a quick aside, I have to say, I love the whole aesthetic of Amp. Their blog, their docs, even the way they write and communicate.

    Anyway, let’s dive right in.

    What Makes Amp Different

    Aside from the great vibes? For starters, Amp is model agnostic, which means you can use it with Claude Sonnet and Opus (if you’re coming from Claude Code) or GPT-5 and Gemini 2.5 Pro.

    Interestingly enough, you can’t change which model it uses under the hood (or maybe I haven’t found a way to do that). It picks the best model for the job, and defaults to Sonnet with a 1M token window. If it needs more horsepower it can switch to a model like (I think) o3 or GPT-5. You can also force it to do so by telling it to use “The Oracle”.

    The other cool feature is that it is collaborative-ish (more on this later). You can create a shared workspace for your teammates and every conversation that someone has gets synced to that workspace, so you can view it in your dashboard. This allows you to see how others are using it and what code changes they’re making.

    You can also link to a teammate’s conversation from your own to add context. This is useful if you’re taking over a feature from them.

    Setting up your project

    If you’re using Amp in an existing project, start by setting up an Agents.md file. This is the main context file that Amp looks for when you have a new conversation (aka Thread) with Amp.

    If you’ve used Claude Code or have read my tutorial on it, you’ll see it’s the same concept, except Claude Code looks for Claude.md. I suggest following the same patterns:

    • Have Amp generate the document for you by typing in /agent
    • For large codebases, create one general purpose Agents.md file that talks about the overall project and conventions, and multiple specific Agents.md file for each sub-project or sub-directory. Amp will automatically pulls those in when needed.
    • Use @ to mention other documentation files in your main Agents.md files.
    • Periodically update these files.

    If you’re in a brand new project, ask Amp to set up your project structure first and then create the Agents.md file.

    Working with amp

    After you’re done setting up, type in /new and start a new thread. Much like I describe in my Claude Code tutorial, we want to have numerous small and contained conversations with Amp to manage context and stay on task.

    Amp works exactly like any other coding agent. You give it a task, it reasons, then uses tools like Read to gather more information, then uses tools like Write to write code. It may go back and forth, reading, editing, using other tools, and when it’s done there’s a satisfying ping sound to let you know.

    If you’re working on a new feature, I suggest doing the following things:

    • Create a new git branch. Ask Amp to do so, or create a custom slash command (more on this later)
    • Start by planning. There’s no separate plan mode like Claude Code (which is too rigid anyway) so just ask Amp to plan first before writing code, or set up a custom slash command.
    • Once you have a detailed plan, ask it to commit this to a temporary file, and then have it pick off pieces in new threads.

    Amp also has a little todo feature as it keeps track of work within a thread.

    Tools

    Tool usage is what makes a coding agent come to life. Amp has a bunch of them built-in (your standard search, read, write, bash, etc.)

    You can also customize and extend them with MCPs and custom tools. I’ve already covered MCPs on my blog before so I won’t go into too much detail here. What you need to know:

    • Set up MCPs in the global Amp settings at ~/.config/amp/settings.json for MacOS
    • Don’t get too crazy with them, they fill up context window, so only use a handful of MCPs. In fact, only use MCPs if you don’t have a CLI option.

    The more interesting feature here is Toolboxes, to set up custom tools in Amp. This basically allows you to write custom scripts that Amp can call as tools.

    You first need to set an environment variable AMP_TOOLBOX that points to a directory containing your scripts.

    Bash
    # Create toolbox directory
    mkdir -p ~/.amp-tools
    export AMP_TOOLBOX=~/.amp-tools
    
    # Add to your shell profile for persistence
    echo 'export AMP_TOOLBOX=~/.amp-tools' >> ~/.bashrc

    For each script in this directory, you’ll need a function that describes the tool, and a function that executes the tool.

    When Amp starts, it scans this directory and automatically discovers your custom tools. It also runs their description functions (via TOOLBOX_ACTION) so that it knows what they’re capable of. That way, when it’s deciding which tool to use, it can look through the descriptions, pick a custom tool, and then run the function that executes it.

    Bash
    #!/bin/bash
    # ~/.amp-tools/check-dev-services
    
    if [ "$TOOLBOX_ACTION" = "describe" ]; then
        # Output description in key-value pairs, one per line
        echo "name: check-dev-services"
        echo "description: Check the status of local development services (database, Redis, API server)"
        echo "services: string comma-separated list of services to check (optional)"
        exit 0
    fi
    
    # This is the execute phase - do the actual work
    if [ "$TOOLBOX_ACTION" = "execute" ]; then
        echo "Checking local development services..."
        echo
    
        # Check database connection
        if pg_isready -h localhost -p 5432 >/dev/null 2>&1; then
            echo "✅ PostgreSQL: Running on port 5432"
        else
            echo "❌ PostgreSQL: Not running or not accessible"
        fi
    
        # Check Redis
        if redis-cli ping >/dev/null 2>&1; then
            echo "✅ Redis: Running and responding"
        else
            echo "❌ Redis: Not running or not accessible"
        fi
    
        # Check API server
        if curl -s http://localhost:3000/health >/dev/null; then
            echo "✅ API Server: Running on port 3000"
        else
            echo "❌ API Server: Not running on port 3000"
        fi
    
        echo
        echo "Development environment status check complete."
    fi

    Permissions

    Before Amp runs any tool or MCP, it needs your permission. You can create tool-level permissions in the settings or using the /permissions slash command, which Amp checks before executing a tool.

    As you can see here, you can get quite granular with the permissions. You can blanket allow or reject certain tools, or have it ask you for permissions each time it uses something. You can even delegate it to an external program.

    Subagents

    Amp can spawn subagents via the Task tool for complex tasks that benefit from independent execution. Each subagent has its own context window and access to tools like file editing and terminal commands.

    When Subagents Excel:

    • Multi-step tasks that can be broken into independent parts
    • Operations producing extensive output not needed after completion
    • Parallel work across different code areas
    • Keeping the main thread’s context clean

    Subagent Limitations:

    • They work in isolation and can’t communicate with each other
    • You can’t guide them mid-task
    • They start fresh without your conversation’s accumulated context

    While you can’t define a subagent in Amp, you can directly tell Amp to spawn a subagent while you’re working with it. Say there’s a bug and you don’t want to use up the context in your main thread, tell it to spawn a subagent to fix the bug.

    Slash Commands

    We’ve already covered a few slash commands but if you want to see the full list of available slash commands, just type in / and they’ll pop up. You can also type /help for more shortcuts.

    You can also define custom slash commands. Create a .agents/commands/ folder in your working directory and start defining them as plain text markdown files. This is where you can create the /plan command I mentioned earlier which is just an instruction to tell Amp you want to plan out a new feature and you don’t want to start coding just yet.

    Team Collaboration: Multiplayer Coding

    I mentioned this earlier so if you’re bringing a team onto your project, it’s worth setting up a workspace. Create this from the settings page at ampcode.com/settings.

    Workspaces provide:

    • Shared Thread Visibility: Workspace threads are visible to all workspace members by default
    • Pooled Billing: Usage is shared across all workspace members
    • Knowledge Sharing: There’s nothing like getting to see how the smartest people on your team are actually using coding agents
    • Leaderboards: Each workspace includes a leaderboard that tracks thread activity and contributions

    Joining Workspaces: To join a workspace, you need an invitation from an existing workspace member. Enterprise workspaces can enable SSO to automatically include workspace members.

    Thread Sharing Strategies

    Thread Visibility Options: Threads can be public (visible to anyone with the link), workspace-shared (visible to workspace members), or private (visible only to you).

    Best Practices for Thread Sharing:

    1. Feature Development: Share threads showing how you implemented complex features
    2. Problem Solving: Share debugging sessions that uncovered interesting solutions
    3. Learning Examples: Share threads that demonstrate effective prompting techniques
    4. Code Reviews: Include links to Amp threads when submitting code for review to provide context

    Final Words

    I haven’t really gone into how to prompt or work with Amp because I’ve covered it in detail previously as these are patterns that apply across all coding agents (document well, start with a plan, keep threads short, use git often, etc.).

    If you’re new to AI coding, I suggest you read my other guides to understand the patterns and then use this guide for Amp specific tips and tricks.

    And, of course, the best way to learn is to do it yourself, so just start using Amp in a project and go from there.

    If you have any questions, feel free to reach out!

    Want to build your own AI agents?

    Sign up for my newsletter covering everything from the tools, APIs, and frameworks you need, to building and serving your own multi-step AI agents.

  • Building a Deep Research Agent with LangGraph

    Building a Deep Research Agent with LangGraph

    I was talking to a VC fund recently about their investment process. Part of their due diligence is doing thorough and deep research about the market, competition, even the founders, for every startup pitch they receive.

    They use OpenAI’s Deep Research for the core research (Claude and Gemini have these features too) but there’s still a lot of manual work to give it the right context, guide the research, incorporate their previous research and data, and edit the final output to match their memo formats.

    They wanted a way to integrate it into their workflow and automate the process. and that’s why they approached me.

    It turns out there’s no magic to OpenAI’s Deep Research features. It’s all about solid Agent Design Principles.

    And since I recently wrote a tutorial on how to build a coding agent, I figured I’d do one for Deep Research!

    In this tutorial, you’ll learn how to create a Deep Research Agent, similar to OpenAI’s using LangGraph.

    Want to build your own AI agents?

    Sign up for my newsletter covering everything from the tools, APIs, and frameworks you need, to building and serving your own multi-step AI agents.

    Why Roll Your Own Deep Research?

    As I mentioned, OpenAI, Claude, and Gemini all have their own Deep Research product. They’re good for general purpose usage but when you get into specific enterprise workflows or domains like law, finance, etc., there are other factors to think about:

    1. Customization & Control: You may want control over which sources are trusted, how evidence is weighed, what gets excluded. You may also want to add your own heuristics, reasoning loops, and custom output styles.
    2. Source Transparency & Auditability: You may need to choose and log sources and also store evidence trails for compliance, legal defensibility, or investor reporting.
    3. Data Privacy & Security: You may want to keep sensitive queries inside your environment, or use your own private data sources to enrich the research.
    4. Workflow Integration: Instead of copying and pasting to a web app, you can embed your own research agent in your existing workflow and trigger it automatically via an API call.
    5. Scale and Extensibility: Finally, rolling your own means you can use open source models to reduce costs at scale, and also extend it into your broader agent stack and other types of work.

    I actually think there’s a pretty big market for custom deep research agents, much like we have a massive custom RAG market.

    Think about how many companies spend billions of dollars on McKinsey and the like for market research. Corporations will cut those $10M retainers if an in-house DeepResearch agent produces 80% of the same work.

    Why LangGraph?

    We could just code this in pure Python but I wanted to use an agent framework to abstract away some of the context management stuff. And since I’ve already explored other frameworks on this blog, like Google’s ADK, I figured I’d give LangGraph a shot.

    LangGraph works a bit different to other frameworks in that it lets us model any workflow as a state machine where data flows through specialized nodes, each one handling one aspect of the workflow.

    This gives us some important advantages:

    • State management made simple. Every step in our deep research pipeline passes along and updates a shared state object. This makes it easy to debug and extend.
    • Graph-based execution. Instead of linear scripts, LangGraph lets you build an explicit directed graph of nodes and edges. That means you can retry, skip, or expand nodes later without rewriting your whole pipeline.
    • Reliability and observability. Built-in support for retries, checkpoints, and inspection makes it easier to trust your agent when it runs for minutes and touches dozens of APIs.
    • Future-proofing. When you want to expand from a linear flow to something collaborative, you can do it by just adding nodes and edges to the graph.

    Understanding the Research Pipeline

    To keep this simple, our deep research agent will follow a linear pipeline that mirrors a basic research workflow. So it’s not really an “agent”, because it follows a pre-defined flow, but I’ll explain how you can make it more agentic later.

    Think about how you research a complex topic manually:

    1. You start by breaking down the big question into smaller, focused questions
    2. You search for information on each sub-topic
    3. You collect and read through multiple sources
    4. You evaluate which information is most reliable and relevant
    5. You synthesize everything into a coherent narrative

    Our agent will work the same way:

    Markdown
    Research Question → Planner → Searcher → Fetcher → Ranker → Writer → Final Report
    

    Each node has a specific responsibility:

    Planner Node: Takes your research question and breaks it into 3-7 focused sub-questions. Also generates optimized search queries for each sub-question. If your question is vague, it asks clarifying questions first.

    Searcher Node: Uses the Exa API to find relevant web sources for each search query. Smart enough to filter out low-quality sources and prioritize recent content for time-sensitive queries.

    Fetcher Node: Downloads web pages and extracts clean, readable text. Handles modern JavaScript-heavy websites using Crawl4AI, removes navigation menus and ads, and splits content into manageable passages.

    Ranker Node: Takes all the text passages and ranks them by relevance to the original research question. Uses neural reranking with Cohere to find the most valuable information.

    Writer Node: Takes all the information and compiles it into a comprehensive executive report with proper citations, executive summary, and strategic insights.

    Setting Up the Foundation

    Aside from LangGraph, we’re using a few other tools to build out our app:

    • Exa: Exa is awesome for a deep research agent because of it’s AI-optimized search API that understands semantic meaning rather than just keywords.
    • Crawl4AI: This is a free library for web scraping and handles modern JavaScript-heavy websites that traditional scrapers can’t process
    • GPT-4o: We’re going to be using GPT-4o as our main model for planning our search and writing the final report. You can use GPT-5 but it’s overkill.
    • Cohere: Finally, we use Cohere to provide specialized neural reranking to identify the most relevant content that we get back from our searches.

    Feel free to switch out any of these tools for something else. That’s the beauty of rolling your own deep research.

    Designing the Data Models

    As I mentioned earlier, LangGraph models a workflow as a state machine. So we need to start with data models that define the shared state that flows through the workflow.

    Think of this state as a growing research folder that each node adds to – the planner adds sub-questions, the searcher adds sources, the fetcher adds content, and so on.

    The most important model is `ResearchState`, which acts as our central data container:

    Python
    # src/deep_research/models/core.py
    class ResearchState(BaseModel):
        # Input
        research_question: Optional[ResearchQuestion] = None
    
        # Intermediate states
        sub_questions: List[SubQuestion] = Field(default_factory=list)
        search_queries: List[str] = Field(default_factory=list)
        sources: List[Source] = Field(default_factory=list)
    
        # Final output
        research_report: Optional[ResearchReport] = None
    
        # Processing metadata
        status: ResearchStatus = ResearchStatus.PENDING
        current_step: str = "initialized"
        error_message: Optional[str] = None
        processing_stats: Dict[str, Any] = Field(default_factory=dict)

    This state object starts with just a research question and gradually accumulates data as it moves through the pipeline. Each field represents a different stage of processing – from the initial question to sub-questions, then sources, and finally a complete report.

    We also need supporting models for individual data types like `ResearchQuestion` (the input), `Source` (web pages we find), `Passage` (chunks of text from those pages), and `ResearchReport` (the final output). Each uses Pydantic for validation and includes metadata like timestamps and confidence scores.

    The implementation follows the same pattern as `ResearchState` with proper field validation and default values.

    Building the LangGraph Workflow

    Now let’s build the core workflow that orchestrates our research pipeline. This means defining a state graph where each node can modify shared state and edges determine the flow between nodes.

    Here’s how we set up our workflow structure:

    Python
    # Create the state graph
    workflow = StateGraph(ResearchState)
    
    # Add our six research nodes
    workflow.add_node("planner", planner_node)
    workflow.add_node("searcher", searcher_node) 
    workflow.add_node("fetcher", fetcher_node)
    workflow.add_node("ranker", ranker_node)
    workflow.add_node("writer", writer_node)
    
    # Define the linear flow
    workflow.set_entry_point("planner")
    workflow.add_edge("planner", "searcher")
    workflow.add_edge("searcher", "fetcher") 
    workflow.add_edge("fetcher", "ranker")
    workflow.add_edge("ranker", "writer")
    workflow.add_edge("writer", END)
    
    # Compile into executable graph
    graph = workflow.compile()
    

    The LangGraph workflow orchestrates our research pipeline. Think of it as the conductor of an orchestra – it knows which instrument (node) should play when and ensures they all work together harmoniously.

    The workflow class does three main things:

    • Graph Construction: Creates a LangGraph StateGraph and connects our six nodes in sequence.
    • Node Wrapping: Each node gets wrapped with error handling and progress reporting.
    • Execution Management: Runs the graph and handles any failures gracefully.

    Want to build your own AI agents?

    Sign up for my newsletter covering everything from the tools, APIs, and frameworks you need, to building and serving your own multi-step AI agents.

    Implementing the Research Nodes

    Now let’s build each node in our research pipeline. I’ll show you the key concepts and implementation strategies for each one, focusing on the interesting architectural decisions.

    Node 1: The Planner – Breaking Down Complex Questions

    The planner is the strategist of our system. It takes a potentially vague research question and transforms it into a structured research plan:

    Context Clarification: If someone asks “What’s happening with AI?”, that’s too broad to research effectively. The planner detects this and generates clarifying questions:

    • “Are you interested in recent AI breakthroughs, business developments, or regulatory changes?”
    • “What’s your intended use case – research, investment, or staying informed?”
    • “Any specific AI domains of interest (like generative AI, robotics, or safety)?”

    Question Decomposition: Once it has enough context, it breaks the main question into 3-7 focused sub-questions. For “latest AI safety developments,” it might generate:

    1. “What are the most recent AI safety research papers and findings from 2025?”
    2. “What regulatory developments in AI safety have occurred recently?”
    3. “What are the latest industry initiatives and standards for AI safety?”
    Python
    class PlannerNode:
        async def plan(self, state: ResearchState) -> ResearchState:
            self._report_progress("Analyzing research question", "planning")
            
            # Generate sub-questions
            sub_questions = await self._decompose_question(state.research_question)
            state.sub_questions = sub_questions
            
            self._report_progress(f"Generated {len(sub_questions)} sub-questions", "planning")
            return state
            
        async def decompose_question(self, state: ResearchState) -> ResearchState:
            current_date = datetime.now().strftime("%B %Y")  # "August 2025"
            
            system_prompt = f"""You are a research planning expert. 
            Current date: {current_date}
            
            Decompose this research question into 3-7 focused sub-questions that together 
            will comprehensively answer the main question. If the question asks for 
            "latest" or "recent" information, focus on finding up-to-date content."""
            
            response = await self.llm.ainvoke([system_prompt, user_question])
            # ... parsing logic to create SubQuestion objects
    

    Node 2: The Searcher – Finding Relevant Sources

    The searcher takes our optimized queries and finds relevant web sources. It uses the Exa API, which is specifically designed for AI applications and provides semantic search capabilities beyond traditional keyword matching.

    The Exa API also allows us to customize our searches:

    • Source type detection: Automatically categorizes sources as academic papers, news articles, blog posts, etc.
    • Quality filtering: Filters out low-quality sources and duplicate content
    • Temporal prioritization: For time-sensitive queries, prioritizes recent sources
    • Domain filtering: Can focus on specific domains if specified
    Python
    class SearcherNode:
        def __init__(self, exa_api_key: str, max_sources_per_query: int = 10):
            self.exa = Exa(api_key=exa_api_key)
            self.max_sources_per_query = max_sources_per_query
        
        async def search_for_subquestion(self, subquestion: SubQuestion) -> List[Source]:
            results = []
            for query in subquestion.search_queries:
                # Use Exa's semantic search with temporal filtering
                search_results = await self.exa.search(
                    query=query,
                    num_results=self.max_sources_per_query,
                    include_domains=["gov", "edu", "arxiv.org"],  # Prioritize authoritative sources
                    start_published_date="2025-01-01"  # Recent content for temporal queries
                )
                # Convert Exa results to our Source objects

    Node 3: The Fetcher – Extracting Clean Content

    The fetcher downloads web pages and extracts clean, readable text. This is more complex than it sounds because modern websites are full of navigation menus, ads, cookie banners, and JavaScript-generated content.

    I normally use Firecrawl but I wanted to explore a free and open-source package for this project.

    We’ll use Crawl4AI because it handles JavaScript-heavy sites and provides intelligent content extraction. It can distinguish between main content and page chrome (navigation, sidebars, etc.).

    Python
    class FetcherNode(AsyncContextNode):
         async def fetch(self, state: ResearchState) -> ResearchState:
            self._report_progress("Starting content extraction", "fetching")
            
            all_passages = []
            for source in state.sources:
                try:
                    # Extract clean content using Crawl4AI
                    result = await self.crawler.arun(
                        url=str(source.url),
                        word_count_threshold=10,
                        exclude_tags=['nav', 'footer', 'aside', 'header'],
                        remove_overlay_elements=True,
                    )
                    
                    if result.success and result.markdown:
                        # Split content into manageable passages
                        passages = self._split_into_passages(result.markdown, source.id)
                        all_passages.extend(passages)
                except Exception:
                    continue  # Skip failed sources
            
            state.passages = all_passages
            return state

    Node 4: The Ranker – Finding the Most Relevant Information

    After fetching, we might have hundreds of articles. The ranker’s job is to identify the most relevant ones for our research question.

    We first cut up all the articles into overlapping passages. We then pass all those passages into Cohere’s reranking API and re-rank them against the original queries. We can then take the first x% of passages and pass them on to the next node.

    By doing it this way, we eliminate a lot of the fluff that many articles tend to have and extract only the meat.

    Python
    class RankerNode(NodeBase):
        async def rerank_with_cohere(self, passages: List[Passage], query_text: str) -> List[Passage]:
            """Optionally rerank passages using Cohere's rerank API."""
            if not self.cohere_client or not passages:
                return passages
    
            try:
                # Prepare documents for reranking
                documents = [p.content for p in passages]
    
                # Use Cohere rerank
                rerank_response = self.cohere_client.rerank(
                    model="rerank-english-v3.0",
                    query=query_text,
                    documents=documents,
                    top_n=min(len(documents), self.rerank_top_k),
                    return_documents=False,
                )
    
                # Reorder passages based on Cohere ranking
                reranked_passages = []
                for result in rerank_response.results:
                    if result.index < len(passages):
                        passage = passages[result.index]
                        passage.rerank_score = result.relevance_score
                        reranked_passages.append(passage)
    
                return reranked_passages
    
            except Exception as e:
                print(f"Cohere reranking failed: {e}")
                # Fallback: return original passages
                return passages

    Node 6: The Writer – Synthesizing the Final Report

    The writer takes all the information and compiles it into a comprehensive executive report. It’s optimized for strategic decision-making with executive summaries, clear findings, and proper citations.

    At the simplest level we just need to pass the original query and all the passages to an LLM (I’m using GPT-4o in this example but any LLM should do) and have it turn that into a research report.

    This node is mostly prompt engineering.

    Python
    async def generate_research_content(self, state: ResearchState
        ) -> tuple[str, List[ExecutiveSummaryPoint]]:
            # Build context about sources  
        recent_sources = len(
            [
                s
                for s in sources_with_content
                if s.publication_date
                and (datetime.now() - s.publication_date).days < 180
            ]
        )
        source_context = f"Based on analysis of {len(sources_with_content)} sources ({recent_sources} recent)."
    
        system_prompt = """You are a research analyst writing a comprehensive, readable research report from web sources.
            
    Your task:
    1. Analyze the provided source content and synthesize key insights
    2. Create a natural, flowing report that reads well
    3. Organize information logically with clear sections and headings
    4. Write in an engaging, accessible style suitable for executives
    5. Include proper citations using [Source: URL] format
    6. Identify key themes, trends, and important findings
    7. Note any contradictions or conflicting information
    
    IMPORTANT: Structure your response as follows:
    ---EXECUTIVE_SUMMARY---
    [Write 3-5 concise bullet points that capture the key insights from your research]
    
    ---FULL_REPORT---
    [Write the detailed research report with proper sections, analysis, and citations]
    
    This format allows me to extract both the executive summary and full report from your response."""
    
            # Prepare source content for the LLM
        source_texts = []
        for i, source in enumerate(sources_with_content, 1):
            # Truncate very long content to fit in context window
            content = source.content or ""
            if len(content) > 8000:  # Reasonable limit per source
                content = content[:8000] + "...[truncated]"
                
            source_info = f"Source {i}: {source.title or 'Untitled'}\nURL: {source.url}\n"
            if source.publication_date:
                source_info += f"Published: {source.publication_date.strftime('%Y-%m-%d')}\n"
            source_info += f"Content:\n{content}\n"
            source_texts.append(source_info)
            
        sources_text = "\n---\n".join(source_texts)
    
        research_question = state.research_question
        if not research_question:
            return "No research question provided.", []
    
        human_prompt = f"""Research Question: {research_question.question}
    
    Context: {research_question.context or 'General research inquiry'}
    
    {source_context}
    
    Source Materials:
    {sources_text}
    
    Please write a comprehensive, well-structured research report that analyzes these sources and answers the research question:"""
    
        try:
            messages = [
                SystemMessage(content=system_prompt),
                HumanMessage(content=human_prompt),
            ]
    
            response = await self.llm.ainvoke(messages)
            if isinstance(response.content, str):
                content = response.content.strip()
            else:
                content = str(response.content).strip()
    
            # Parse the structured response
            return self._parse_llm_response(content)
    
        except Exception as e:
            print(f"Research content generation failed: {e}")
            return "Unable to generate research content at this time.", []

    The final output

    Here’s what it looks like when everything comes together. If you have a look at the full source code on my GitHub, you’ll see that I’ve added in a CLI, but you could trigger this from any other workflow.

    Python
    # Install and setup
    pip install -e .
    export OPENAI_API_KEY="your-key"
    export EXA_API_KEY="your-key"
    
    # Run a research query
    deep-research research "What are the latest developments in open source LLMs?"
    

    When you run this command, here’s what happens behind the scenes:

    1. Context Analysis: The planner analyzes your question. If it’s vague, it presents clarifying questions:
      • “Are you interested in recent breakthroughs, regulatory developments, or industry initiatives?”
      • “What’s your intended use case – research, investment, or staying informed?”
    2. Research Planning: Based on your answers, it generates focused sub-questions:
      • “What are the most recent open source AI research papers and findings from 2025?”
      • “What developments in open source AI have occurred recently?”
    3. Intelligent Search: For each sub-question, it executes multiple searches using Exa’s semantic search, finding 50-100 relevant sources.
    4. Content Extraction: Downloads and extracts clean text from all sources using Crawl4AI, handling JavaScript and filtering out navigation/ads.
    5. Relevance Ranking: Ranks hundreds of text passages to find the most valuable information.
    6. Report Generation: Synthesizes everything into a comprehensive executive report with strategic insights.

    Next Steps

    As I said at the start, this is a simple linear workflow and not really an agent.

    To make it more agentic, we can redesign the system around a reasoning model, with each node being a tool it can use, and a ReAct loop.

    The cool thing about LangGraph is that, since we’ve already defined our tools (individual nodes) we don’t really need to change much. We simply change the graph from a linear one to a hub-and-spoke model.

    So instead of one node leading to the next, we have a central LLM node, and it has two-way connections to other nodes. We send our request to the central LLM node, and it decides what tools it wants, and in which order. It can call tools multiple times, and it can also respond back to the user to check-in or clarify the direction, before executing more tool calls.

    This system is much more powerful because the user and the LLM can change directions during the research process as new information comes in. In the example above, let’s say we pick up on the Vicuna model and also GPT-OSS. We may determine that since GPT-OSS is a trending topic that we should focus on that direction, and drop Vicuna.

    Similarly if we’re not satisfied with the final report, we may go back and forth with our LLM to run a few more queries, verify a source, or fine tune the structure.

    And if we want to add new tools, like a source verification tool, we simply define a new node, and add a two way connection to our central node.

    Conclusion

    By combining LangGraph’s workflow capabilities with specialized APIs like Exa and Crawl4AI, we created a system that automates the research process from question to comprehensive report.

    While the big AI labs have built impressive research products, you now have the blueprint to build something equally powerful (and more customized) for your specific needs.

    Want to build your own AI agents?

    Sign up for my newsletter covering everything from the tools, APIs, and frameworks you need, to building and serving your own multi-step AI agents.

  • Build a Coding Agent from Scratch: The Complete Python Tutorial

    Build a Coding Agent from Scratch: The Complete Python Tutorial

    I have been a heavy user of Claude Code since it came out (and recently Amp Code). As someone who builds agents for a living, I’ve always wondered what makes it so good.

    So I decided to try and reverse engineer it.

    It turns out building a coding agent is surprisingly straightforward once you understand the core concepts. You don’t need a PhD in machine learning or years of AI research experience. You don’t even need an agent framework.

    Over the course of this tutorial, we’re going to build a baby Claude Code using nothing but Python. It won’t be nearly as good as the real thing, but you will have a real, working agent that can:

    • Read and understand codebases
    • Execute code safely in a sandboxed environment
    • Iterate on solutions based on test results and error feedback
    • Handle multi-step coding tasks
    • Debug itself when things go wrong

    So grab your favorite terminal, fire up your Python environment, and let’s build something awesome.

    Understanding Coding Agents: Core Concepts

    Before we dive into implementation details, let’s take a step back and define what a “coding agent” actually is.

    An agent is a system that perceives its environment, makes decisions based on those perceptions, and takes actions to achieve goals.

    In our case, the environment is a codebase, the perceptions come from reading files and executing code, and the actions are things like creating files, running tests, or modifying existing code.

    What makes coding agents particularly interesting is that they operate in a domain that’s already highly structured and rule-based. Code either works or it doesn’t. Tests pass or fail. Syntax is valid or invalid. This binary feedback creates excellent training signals for iterative improvement.

    The ReAct Pattern: How Agents Actually Think

    Most agents today follow a pattern called ReAct (Reason, Act, Observe). Here’s how it works in practice:

    Reason: The agent analyzes the current situation and plans its next step. “I need to understand this codebase. Let me start by looking at the main entry point and understanding the project structure.”

    Act: The agent takes a concrete action based on its reasoning. It might read a file, execute a command, or write some code.

    Observe: The agent examines the results of its action and incorporates that feedback into its understanding.

    Then the cycle repeats. Reason → Act → Observe → Reason → Act → Observe.

    It’s similar to how humans solve problems. When you’re debugging a complex issue, you don’t just stare at the code hoping for divine inspiration. You form a hypothesis (reason), test it by adding a print statement or running a specific test (act), look at the results (observe), and then refine your understanding based on what you learned.

    The Four Pillars of Our Coding Agent

    Every effective AI agent needs four core components – The brain, the tools, the instructions, and the memory or context.

    I’ll skim over the details here but I’ve explained more in my guide to designing AI agents.

    1. The brain is the core LLM that does the reasoning and code gen. Reasoning models like Claude Sonnet, Gemini 2.5 Pro, and OpenAI’s o-series or GPT-5 are recommended. In this tutorial we use Claude Sonnet.
    2. The instructions are the core system prompt you give to the LLM when you initialize it. Read about prompt engineering to learn more.
    3. The tools are the concrete actions your agent can take in the world. Reading files, writing code, executing commands, running tests – basically anything a human developer can do through their keyboard.
    4. Memory is the data your agent works with. For coding agents, we need a context management system that allows your agent to work with large codebases by intelligently selecting the most relevant information for each task.

    For coding agents specifically, I’d add that we need an execution sandbox. Your agent will be writing and executing code, potentially on your production machine. Without proper sandboxing, you’re essentially giving a very enthusiastic and tireless intern root access to your system.

    Want to build your own AI agents?

    Sign up for my newsletter covering everything from the tools, APIs, and frameworks you need, to building and serving your own multi-step AI agents.

    The Agent Architecture We’re Building

    I want to show you the complete blueprint before we start coding, because understanding the overall architecture will make every individual component make sense as we implement it.

    Here’s our roadmap:

    Phase 1: Minimal Viable Agent – Get the core ReAct loop working with basic file operations. By the end of this phase, you’ll have an agent that can read files, understand simple tasks, and reason through solutions step by step.

    Phase 2: Safe Code Execution Engine – Add the ability to generate and execute code safely. This is where we implement AST-based validation and process sandboxing. Your agent will be able to write Python code, test it, and iterate based on the results.

    Phase 3: Context Management for Large Codebases – Scale beyond toy examples to real projects. We’ll implement search and intelligent context retrieval so your agent can work with codebases containing hundreds of files.

    Each phase builds on the previous one, and you’ll have working software at every step.

    Phase 1: Minimum Viable Agent

    We’re going to do this all in one file and 300 lines of code. Just create a folder in your computer and in it create a file called agent.py

    Step 1: Define the Brain

    Everything goes into one big CodingAgent class. We’re going to initialize an Anthropic client and also set our working directory:

    Python
    def __init__(self, 
                 api_key: str, 
                 working_directory: str = ".", 
                 history_file: str = "agent_history.json"):
        self.client = anthropic.Anthropic(api_key=api_key)
        self.working_directory = Path(working_directory).resolve()
        self.history_file = history_file
        self.messages: List[Dict] = []
        self.load_history()

    You’ll notice some references to ‘history’ in there. That’s our primitive memory and context management. I’ll come to it later.

    Let’s use Sonnet 4 as our main model. It’s solid reasoning model and really good at coding.

    Python
    async def _call_claude(self, messages: List[Dict]) -> Tuple[Any, Optional[str]]:
        try:
            response = self.client.messages.create(
                model="claude-sonnet-4-20250514",
                max_tokens=4000,
                system=SYSTEM_PROMPT,
                tools=TOOLS_SCHEMA,
                messages=messages,
                temperature=0.7
                )
            return response.content, None
        except anthropic.APIError as e:
            return None, f"API Error: {str(e)}"
        except Exception as e:
            return None, f"Unexpected error calling Claude API: {str(e)}"

    And that’s really it. This is boilerplate code for calling a Claude model. Gemini, GPT, and others are different, but as long as you’re using a reasoning model you’re good.

    Step 2: Give it Instructions

    When we initialized our Anthropic client, you may have noticed we’re passing in a System Prompt and a Tools Schema. These are the instructions we give to our model so that it know how to behave and what tools it has access to.

    Here’s my system prompt, feel free to tweak it as needed:

    Python
    SYSTEM_PROMPT = """You are a helpful coding agent that assists with programming tasks and file operations.
    
    When responding to requests:
    1. Analyze what the user needs
    2. Use the minimum number of tools necessary to accomplish the task
    3. After using tools, provide a concise summary of what was done
    
    IMPORTANT: Once you've completed the requested task, STOP and provide your final response. Do not continue creating additional files or performing extra actions unless specifically asked.
    
    Examples of good behavior:
    - User: "Create a file that adds numbers" → Create ONE file, then summarize
    - User: "Create files for add and subtract" → Create ONLY those two files, then summarize
    - User: "Create math operation files" → Ask for clarification on which operations, or create a reasonable set and stop
    
    After receiving tool results:
    - If the task is complete, provide a final summary
    - Only continue with more tools if the original request is not yet fulfilled
    - Do not interpret successful tool execution as a request to do more
    
    Be concise and efficient. Complete the requested task and stop."""

    Current gen models have a tool use ability and you just need to send it a schema up front so that when it’s reasoning it can look at the tool list and decide if it needs one to help with it’s task.

    We define it like this:

    Python
    TOOLS_SCHEMA = [
      {
          "name": "read_file",
          "description": "Read the contents of a file",
          "input_schema": {
              "type": "object",
              "properties": {
                  "path": {"type": "string", "description": "The path to the file to read"}
              },
              "required": ["path"]
          }
      },
          { # Other tool definitions follow a similar pattern
            }
    ]

    Step 3: Define The Tool logic

    Let’s also define our actual tool logic. Here’s what it would look like for the Read File tool:

    Python
    async def _read_file(self, path: str) -> Dict[str, Any]:
        """Read a file and return its contents"""
        try:
            file_path = (self.working_directory / path).resolve()
            if not str(file_path).startswith(str(self.working_directory)):
                return {"error": "Access denied: path outside working directory"}
                
            with open(file_path, 'r', encoding='utf-8') as f:
                content = f.read()
            return {"success": True, "content": content, "path": str(file_path)}
        except Exception as e:
            return {"error": f"Could not read file: {str(e)}"}

    Continue defining the rest of the tools that way and add them to the tools schema. You can look at the full code in my GitHub Repository for help.

    I have implemented read, write, list, and search but you can add more for an extra challenge.

    We’ll also need a function to execute the tool that we call if our LLM responds with a tool use request.

    Python
    async def _execute_tool_calls(self, tool_uses: List[Any]) -> List[Dict]:
        tool_results = []
            
        for tool_use in tool_uses:
            print(f"   Executing: {tool_use.name}")
            try:
                if tool_use.name == "read_file":
                    result = await self._read_file(tool_use.input.get("path", ""))
                elif tool_use.name == "write_file":
                    result = await self._write_file(tool_use.input.get("path", ""), 
                                                       tool_use.input.get("content", ""))
                elif tool_use.name == "list_files":
                    result = await self._list_files(tool_use.input.get("path", "."))
                elif tool_use.name == "search_files":
                    result = await self._search_files(tool_use.input.get("pattern", ""), 
                                                     tool_use.input.get("path", "."))
                else:
                    result = {"error": f"Unknown tool: {tool_use.name}"}
            except Exception as e:
                result = {"error": f"Tool execution failed: {str(e)}"}
                
            # Log success/error briefly
            if "success" in result and result["success"]:
                print(f"Tool executed successfully")
            elif "error" in result:
                print(f"Error: {result['error']}")
                
            # Collect result for API
            tool_results.append({
                "tool_use_id": tool_use.id,
                "content": json.dumps(result)
            })
            
        return tool_results

    It’s a bit verbose but good enough for our MVP. And now our Brain is connected with Tools!

    Step 4: Context Management and Memory

    Remember the references to ‘history’ from earlier? That’s a crude implementation of memory. We basically write our conversation to a history file. Every time we start up our agent, it reads that file and loads the full conversation. We can clear the file and start a fresh conversation.

    Python
    def save_history(self):
        """Save conversation history"""
        try:
            with open(self.history_file, 'w') as f:
                json.dump(self.messages, f, indent=2)
        except Exception as e:
            print(f"Warning: Could not save history: {e}")    
        
    def load_history(self):
        """Load conversation history"""
        try:
            if os.path.exists(self.history_file):
                with open(self.history_file, 'r') as f:
                    self.messages = json.load(f)
        except Exception:
            self.messages = []

    Let’s also define some functions to help with context management. Right now we’re just going to track the conversation history and build a messages list.

    Python
    def add_message(self, role: str, content: str):
        """Add a message to conversation history"""
        self.messages.append({"role": role, "content": content})
        self.save_history()
            
    def build_messages_list(self, user_input: Optional[str] = None, 
                           tool_results: Optional[List[Dict]] = None,
                           assistant_content: Optional[Any] = None,
                           max_history: int = 20) -> List[Dict]:
        """Build a clean messages list for the API call"""
        messages = []
            
        # Add conversation history (limited to recent messages for context window)
        start_idx = max(0, len(self.messages) - max_history)
            
        for msg in self.messages[start_idx:]:
            if isinstance(msg, dict) and "role" in msg and "content" in msg:
                # Clean the message for API compatibility
                clean_msg = {"role": msg["role"], "content": msg["content"]}
                messages.append(clean_msg)
            
        # Add new user input if provided
        if user_input:
            messages.append({"role": "user", "content": user_input})
            
        # Add assistant content if provided (for tool use continuation)
        if assistant_content:
            messages.append({"role": "assistant", "content": assistant_content})
            
        # Add tool results as user message if provided
        if tool_results:
            messages.append({
                "role": "user",
                "content": [
                    {
                        "type": "tool_result",
                        "tool_use_id": tr["tool_use_id"],
                        "content": tr["content"]
                    }
                    for tr in tool_results
                ]
            })
            
        return messages

    And those are the core components of our coding agent!

    Step 5: Build the ReAct Loop

    Finally, we need a function to guide our model to follow the ReAct pattern.

    Python
    async def react_loop(self, user_input: str) -> str:
        # Add user message to history
        self.add_message("user", user_input)
            
        # Build initial messages list
        messages = self.build_messages_list(user_input=user_input)
            
        # Track the last text response to avoid duplication
        last_complete_response = None
            
        # Safety limit to prevent infinite loops
        safety_limit = 20
        iterations = 0
            
        while iterations < safety_limit:
            iterations += 1
                
            # Get Claude's response
            content_blocks, error = await self._call_claude(messages)
                
            if error:
                error_msg = f"Error: {error}"
                self.add_message("assistant", error_msg)
                return error_msg
                
            # Parse response into text and tool uses
            text_responses, tool_uses = self._parse_claude_response(content_blocks)
                
            # Store the last complete text response
            if text_responses:
                last_complete_response = "\n".join(text_responses)
                
            # If no tools were used, Claude is done - return final response
            if not tool_uses:
                break
                
            # Execute tools and collect results
            tool_results = await self._execute_tool_calls(tool_uses)
                
            # Build messages for next iteration
            messages = self.build_messages_list(
                assistant_content=content_blocks,
                tool_results=tool_results
            )
            
            # Prepare final response
            if not last_complete_response:
                final_response = "I couldn't generate a response."
            elif iterations >= safety_limit:
                final_response = f"{last_complete_response}\n\n(Note: I reached my processing limit. You may want to break this down into smaller steps.)"
            else:
                final_response = last_complete_response
            
            # Save to history and return
            self.add_message("assistant", final_response)
            return final_response
    
    async def process_message(self, user_input: str) -> str:
        """Main entry point for processing user messages"""
        try:
            # Use the ReAct loop to process the message
            response = await self.react_loop(user_input)
            return response
        except Exception as e:
            error_msg = f"Unexpected error processing message: {str(e)}"
            self.add_message("assistant", error_msg)
            return error_msg

    Yes, it really is just a while loop. We call Claude with our request and it answers. If it needs to use a tool, we process the tool (as defined before) and then send back the tool result.

    And then we loop. We’ve set a safety limit of 20 turns to avoid infinite loops (and to stop you from racking up those api calls).

    When there are no more tool calls, we assume it’s done and print the final response.

    We’re also parsing Claude’s responses for readability so that we can print it to our terminal and see what’s happening.

    Python
    def _parse_claude_response(self, content_blocks: Any) -> Tuple[List[str], List[Any]]:
        text_responses = []
        tool_uses = []
            
        for block in content_blocks:
            if block.type == "text":
                text_responses.append(block.text)
                print(f" {block.text}")
            elif block.type == "tool_use":
                tool_uses.append(block)
                print(f" Tool call: {block.name}")
            
        return text_responses, tool_uses

    Let’s Test it out!

    Our agent is ready to use. We’re at 400 lines of code, but that includes the comments, error handling, and helper functions for verbosity. Our core agent code is ~300 lines. Let’s see if it’s any good!

    Let’s add a main function to our code so that we can get that CLI interface:

    Python
    async def main():
        """Main CLI interface"""he
        print("Welcome to Baby Claude Code!!")
        print("Type 'exit' or 'quit' to quit, 'clear' to clear history, 'history' to show recent messages")
        print("-" * 50)
        
        # Get API key
        api_key = os.getenv("ANTHROPIC_API_KEY")
        if not api_key:
            api_key = input("Enter your Anthropic API key: ").strip()
        
        # Initialize agent
        agent = CodingAgent(api_key)
        
        while True:
            try:
                user_input = input("\n You: ").strip()
                
                if user_input.lower() in ['exit', 'quit']:
                    print("Goodbye!")
                    break
                elif user_input.lower() == 'clear':
                    agent.messages = []
                    agent.save_history()
                    print("History cleared!")
                    continue
                elif user_input.lower() == 'history':
                    print("\nRecent conversation history:")
                    for msg in agent.messages[-10:]:
                        role = msg.get("role", "unknown")
                        content = msg.get("content", "")
                        if len(content) > 100:
                            content = content[:100] + "..."
                        timestamp = msg.get("timestamp", "")
                        print(f"  [{role}] {content}")
                    continue
                elif not user_input:
                    continue
                
                print("\n Agent processing...")
                response = await agent.process_message(user_input)
                
            except KeyboardInterrupt:
                print("\n\nGoodbye!")
                break
            except Exception as e:
                print(f"\n Error: {e}")
    
    
    if __name__ == "__main__":
        asyncio.run(main())

    Now run the file and watch your own baby Claude Code come to life!

    Understanding the Code Flow

    If you’ve been following along, you should have a working coding agent. It’s basic but it gets the job done.

    We first pass your task to the react_loop method, which compiles a conversation history and calls Claude.

    Based on our system prompt and tool schema, Claude decides if it needs to use a tool to answer our request. If so, it sends back a tool request which we execute. We add the results to our message history and send it back to Claude, and loop over.

    We keep doing this until there are no more tool calls, in which case we assume Claude has nothing else to do and we return the final answer.

    Et voila! We have a functioning coding agent that can explain codebases, write new code, and keep track of a conversation.

    Pretty sweet.

    I’ve added all the code to my Github. Enter your email below to receive it.

    Want to build your own AI agents?

    Sign up for my newsletter covering everything from the tools, APIs, and frameworks you need, to building and serving your own multi-step AI agents.

    Phase 2: Adding Code Execution

    We have a coding agent that can read and write code, but in this age of vibe coding, we want it to be able to text and execute code as well. Those bugs ain’t gonna debug themselves.

    All we need to do is give it new tools to execute code. The main complexity is ensuring it doesn’t run malicious code or delete our OS by mistake. That’s why this phase is mostly about code validation and sandboxing. Let’s see how.

    Step 1: Code Refactoring

    Before we do anything, let’s refactor our existing code for better readability and modularity.

    Here’s our new project structure:

    Python
    coding_agent/
    ├── __init__.py           # Package initialization
    ├── config.py             # Central configuration
    ├── agent.py              # Main CodingAgent class
    ├── tools/
    │   ├── __init__.py
    │   ├── base.py          # Tool interface & registry
    │   ├── file_ops.py      # File operation tools
    │   └── code_exec.py     # Code execution tools
    ├── execution/
    │   ├── __init__.py
    │   ├── validator.py     # AST-based validator
    │   └── executor.py      # Sandboxed executor
    └── cli.py               # CLI interface

    Most of the code is pretty much the same. Config.py has our model configuration parameters and system prompt. CLI.py is the main cli interface that we added right at the end of Phase 1.

    Agent.py is the core agent class sans the tools setup, which go into a tools folder. We have a base tool template, then define the read, write and search file tools in file_ops.py

    The new code is the code_exec.py file which contains the meta data for the executor and validator tools, and the actual implementation of those tools are in the execution folder for readability.

    Step 2: The Validator

    The CodeValidator uses Python’s Abstract Syntax Tree (AST) to analyze code before it runs. Think of it as a security guard that inspects code at the gate.

    Python
    class CodeValidator:
        def validate(self, code: str) -> Tuple[bool, List[str]]:
            <em># Parse code into an AST</em>
            tree = ast.parse(code)
            
            <em># Walk the tree looking for dangerous patterns</em>
            self._check_node(tree)
            
            <em># Return validation result</em>
            return len(self.violations) == 0, self.violations

    What the Validator Blocks:

    1. Dangerous Imports
    Python
    import os  # BLOCKED - could delete files
    import subprocess  # BLOCKED - could run shell commands
    import socket  # BLOCKED - could make network connections

    2. File Operations

    Python
    open('file.txt', 'w')  # BLOCKED - could overwrite files
    with open('/etc/passwd', 'r'):  # BLOCKED - could read sensitive files

    3. Dangerous Built-in Functions

    Python
    eval("malicious_code")  # BLOCKED - arbitrary code execution
    exec("import os; os.system('rm -rf /')")  # BLOCKED
    __import__('os')  # BLOCKED - dynamic imports

    4. System Access Attempts

    Python
    sys.exit()  # BLOCKED - could crash the program
    os.environ['SECRET_KEY']  # BLOCKED - environment access

    The validator works by walking the AST and checking each node type:

    • ast.Import and ast.ImportFrom nodes → check against dangerous modules
    • ast.Call nodes → check for dangerous function calls
    • ast.Attribute nodes → check for dangerous attribute access

    Most coding agents don’t actually block all of this. They have a permissioning system to give their users control. I’m just being overly cautious for the sake of this tutorial.

    Step 3: The Executor

    Even if code passes validation, we still need runtime protection. Again, I’m being overly cautious here and creating a custom Python environment with only certain built-in functions:

    Python
    # User code runs with ONLY these functions available
    safe_builtins = {
        'print': print,    # Safe for output
        'len': len,        # Safe for measurement
        'range': range,    # Safe for iteration
        'int': int,        # Safe type conversion
        # ... other safe functions
        
        # Notably missing:
        # - open (no file access)
        # - __import__ (no imports)
        # - eval/exec (no dynamic execution)
        # - input (no user interaction)
    }

    And then when we do run code, it’s in a separate sub-process:

    Python
    process = await asyncio.create_subprocess_exec(
        sys.executable, code_file,
        stdout=asyncio.subprocess.PIPE,
        stderr=asyncio.subprocess.PIPE,
        cwd=str(self.sandbox_dir)  # Isolated directory
    )

    This gives us:

    • Memory isolation: Can’t access parent process memory
    • Crash protection: If code crashes, main program continues
    • Clean termination: Can kill runaway processes
    • Output capture: All output is captured and controlled

    The executor also sets strict resource limits at the OS level:

    Python
    # CPU time limit (prevents infinite loops)
    resource.setrlimit(resource.RLIMIT_CPU, (5, 5))
    
    # Memory limit (prevents memory bombs)
    resource.setrlimit(resource.RLIMIT_AS, (100_000_000, 100_000_000))  # 100MB
    
    # No core dumps (prevents disk filling)
    resource.setrlimit(resource.RLIMIT_CORE, (0, 0))
    
    # Process limit (prevents fork bombs)
    resource.setrlimit(resource.RLIMIT_NPROC, (1, 1))

    As a final safeguard, all code execution has a timeout:

    Python
    try:
        stdout, stderr = await asyncio.wait_for(
            process.communicate(),
            timeout=10  # 10 second maximum
        )
    except asyncio.TimeoutError:
        process.kill()  # Force terminate
        return {"error": "Execution timed out"}

    There’s a bit more code around creating the sandbox environment to execute code but we’re almost at 5,000 words and my WordPress backend is getting sluggish, so I’m not going to paste it all here. You can get it from my Github.

    You’ll also want to update the tool schema with the new tools and also describe how Claude can use them in the system prompt.

    How It All Works Together

    Adding code execution transforms our agent from a simple file manipulator into a true coding assistant that can:

    • Learn from execution results to improve its suggestions
    • Write and immediately test solutions
    • Debug by seeing actual error messages
    • Iterate on solutions that don’t work
    • Validate that code produces expected output

    Here’s the complete flow when the agent executes code:

    Python
    User Request: "Test this fibonacci function"
    
    1. Agent calls execute_code tool
    
    2. CodeValidator.validate(code)
        ├─ Parse to AST
        ├─ Check for dangerous imports ✓
        ├─ Check for dangerous functions ✓
        └─ Check for file operations ✓
    
    3. CodeExecutor.execute(code)
        ├─ Create sandboxed code file
        ├─ Apply restricted builtins
        ├─ Set resource limits
        ├─ Run in subprocess
        ├─ Monitor with timeout
        └─ Capture output safely
    
    4. Return results to agent
        ├─ stdout: "Fibonacci(10) = 55"
        ├─ stderr: ""
        └─ success: true

    And that’s Phase 2! If you’ve been implementing with me, you should be getting results like this:

    Phase 3: Better Context management

    Phases 1 and 2 gave our agent powerful capabilities: it can manipulate files and safely execute code. But try asking it to “refactor the authentication system” in a real project with 500 files, and it hits a wall. The agent doesn’t know:

    • What files are relevant to authentication
    • How components connect across the codebase
    • Which functions call which others
    • What context it needs to make safe changes

    This is the fundamental challenge of AI coding assistants: context. LLMs have a limited context window, and even if we could fit an entire codebase, indiscriminately dumping hundreds of files would be wasteful and confusing. The agent would spend most of its reasoning power just figuring out what’s relevant.

    I’m going to pause here for now and come back to this section later. Meanwhile, read my guide on Context Engineering to understand the concepts behind this. And sign up below for when I complete Phase 3!

    Want to build your own AI agents?

    Sign up for my newsletter covering everything from the tools, APIs, and frameworks you need, to building and serving your own multi-step AI agents.

  • Genie 3 And the Future of AI Generated Video

    Genie 3 And the Future of AI Generated Video

    Do you remember that Will Smith eating Spaghetti video that was generated by AI. The first one in 2023, despite its glitchiness, was fascinating to see. A simple text prompt resulting in something that could possibly be a video.

    Two years later we have Sora’s mesmerizing 60-second clips and Veo 3’s photorealistic sequences. We have passed the Will Smith test. It looks like an actual movie scene of him eating spaghetti.

    But this week, Google announced something that blew me away.

    Imaging stepping into an AI-generated world that responds to your presence, remembers your actions, and evolves based on your choices. For the first time in this entire AI revolution, we won’t be consuming content, we will be experiencing it.

    I’m talking about Genie 3, an AI that doesn’t just generate video, it generates entire interactive 3D environments you can explore for minutes.

    It’s text to… virtual world? Interactive video? You can say something like create a beautiful lake surrounded by trees with mountains in the background, and Genie 3 will generate that but also allow you to move around in that environment like you’re a video game character.

    You’re probably going, well we already have that with video games and VR. No, what I’m talking about is something completely different. It’s not a pre-built world. Everything is generated on the fly.

    And in this blog post, I’m going to explain to you why that’s amazing, and how this technology can change the way we experience media.

    How Genie 3 Actually Works

    Understanding the technical breakthrough helps explain why this represents such a fundamental shift, and why the opportunities are so extraordinary.

    Traditional video generation works like this: you give it a prompt, it generates a complete video sequence, and you watch it passively.

    Genie 3 works fundamentally differently. Instead of generating complete video sequences, it generates the world one frame at a time, in response to your actions. Each new frame considers:

    • The entire history of what you’ve done in that world
    • Where you are currently located
    • What action you just took (moving forward, turning left, jumping)
    • Any new text prompts you’ve given (“make it rain,” “add a friendly robot”)

    This is like having a movie director who creates each scene in real-time based on where you decide to walk and what you ask to see.

    Memory Architecture: How It Remembers Your Journey

    The most impressive technical breakthrough is Genie 3’s memory system. It maintains visual memory extending up to one minute back in time. This means when you explore a forest, walk to a meadow, then decide to return to the forest, the system remembers:

    • Where trees were positioned
    • What the lighting looked like
    • Any objects you might have interacted with
    • The exact path you took to get there

    Real-Time Processing: The 720p at 24fps Challenge

    Genie 3 generates 720p resolution at 24 frames per second while processing user input in real-time. 

    To put that in perspective, traditional AI video generation might take 10-30 seconds to create a 10-second clip. Genie 3 is creating 24 unique images every second, each one considering your movement, the world’s history, and maintaining perfect consistency.

    This real-time capability is what enables actual user engagement rather than passive viewing. You can explore at your own pace, focus on what interests you, and have genuinely interactive experiences.

    Emergent 3D Understanding Without 3D Models

    Here’s where Genie 3 gets genuinely mind-bending from a technical perspective: it creates perfectly navigable 3D environments without using any explicit 3D models or representations.

    Traditional 3D graphics work by creating mathematical models of three-dimensional spaces, defining where every wall, tree, and rock exists in 3D coordinates. Genie 3 learned to understand 3D space by watching millions of hours of 2D video and figuring out the patterns of how 3D worlds appear when viewed from different angles.

    This approach means unlimited variety. Instead of being constrained to pre-built 3D environments, you can create any space imaginable through text description. Ancient Rome, futuristic cities, underwater kingdoms, all equally feasible and equally detailed.

    Dynamic Environment Modification: Promptable Physics

    One of Genie 3’s most impressive capabilities is real-time environment modification. While you’re exploring a world, you can give it new text prompts:

    • “Make it rain” adds realistic precipitation with water physics
    • “Add a sunset” changes the entire lighting system
    • “Spawn a friendly robot” introduces new interactive characters
    • “Turn this into a snowy winter scene” transforms the entire environment

    Imagine virtual showrooms where customers can say “show me this in blue” or “what would this look like in my living room?” and see real-time modifications. Product demonstrations that adapt instantly to customer interests.

    What This Technical Foundation Enables

    Understanding these technical capabilities helps explain why Genie 3 opens such extraordinary business opportunities:

    • Unlimited Content Variety: No pre-built environments means any conceivable space can be created and explored.
    • True Personalization: Each user’s journey through a virtual space is unique and memorable.
    • Engagement Depth: Users spend minutes or hours exploring rather than seconds consuming.
    • Dynamic Adaptation: Experiences can be modified in real-time based on user interests and behavior.
    • Scalable Experiences: Once created, virtual worlds can serve unlimited users simultaneously.

    The companies that understand and leverage these capabilities first will likely define how their entire industries approach customer experience, training, and engagement for the next decade.

    Let’s explore what this would look like in various industries.

    Gaming Industry Disruption: The End of Traditional Development?

    Modern AAA game development economics are insane. A single major title like Call of Duty, Grand Theft Auto, or The Last of Us, now routinely costs $100-200 million to develop. Not market. Develop. Marketing is another $50-100 million.

    Where does that money go? About 60-70% goes to content creation: environmental artists crafting every building, texture artists perfecting every surface, level designers hand-placing every interactive element. Teams of 20-30 artists might spend two years creating environments for a single game.

    Now imagine: a single developer sits down with Genie 3 and describes a game concept. “Create a post-apocalyptic city environment with dynamic weather, interactive buildings, and hidden underground areas.”

    Six hours later, they’re walking through a fully explorable world that would have taken that team of 20-30 artists two years to create.

    Don’t like the layout? Generate five alternatives and playtest them by lunch. Want different art styles? Create variations and see which resonates with early users.

    Based on industry conversations and technology trajectory analysis, I see four ways this transformation unfolds:

    Scenario 1: The Enhanced Studio Model 

    Major studios adopt AI world generation as powerful development tools while maintaining traditional structures. Environmental art teams become AI prompt engineers and world curators. Development timelines compress from five years to two. Budgets drop from $150 million to $50 million while quality increases.

    Scenario 2: The Indie Renaissance 

    Individual creators and small teams use AI world generation to compete directly with major studios. Quality gaps disappear while development costs become negligible. The gaming market fractures into thousands of niche experiences rather than dozens of blockbusters.

    Scenario 3: The Platform Revolution

    New companies emerge as “interactive world Netflix”, platforms where users create, share, and monetize AI-generated gaming experiences. Traditional game companies become either content creators for these platforms or risk irrelevance.

    Scenario 4: The Hybrid Evolution 

    The most likely scenario: a combination of all three. Major studios use AI for rapid prototyping while maintaining creative control. Indies flourish in niche markets. Platform companies provide infrastructure. Different approaches coexist and serve different market segments.

    Education Revolution: From Textbooks to Time Machines

    The global education market processes roughly $6 trillion annually across K-12, higher education, corporate training, and professional development. Despite spending trillions annually, we’re facing the worst engagement crisis in educational history.

    Student engagement has been declining for two decades. Corporate training completion rates hover around 30%. Higher education institutions struggle with retention. K-12 systems grapple with attention span challenges that make traditional instruction increasingly ineffective.

    Interactive AI world generation doesn’t just make education more engaging, it makes previously impossible forms of learning accessible and economical.

    Medical students can practice surgical procedures in AI-generated operating rooms that adapt to their skill level. Engineering students can test design concepts in virtual environments simulating real-world physics. Business students can manage companies in AI-generated market conditions that respond dynamically to strategic decisions.

    Instead of learning about subjects, students learn through direct engagement. Instead of memorizing information for tests, they develop competencies through repeated practice in realistic environments.

    The Metaverse Foundation: Building the Infrastructure of Virtual Worlds

    Remember the metaverse hype of 2021? Meta’s $10 billion investment.

    The first-generation metaverse promised digital worlds where we’d work, play, and socialize. What it delivered were expensive, empty virtual spaces requiring specialized hardware that felt more like tech demos than improvements over existing digital experiences.

    The fundamental problem wasn’t the vision, it was economics. Creating compelling virtual environments required massive investments. A single high-quality metaverse space could cost $500,000 to $1 million, required teams of specialized 3D artists, and took months to complete.

    With technologies like Genie 3, that problem completely disappears. Need a virtual conference room for your team meeting? Generated instantly with exactly the features you need. Want to explore ancient Egypt with historically accurate details? Created on demand with correct architectural features and cultural context.

    The Platform Layer: Companies providing computational infrastructure and AI capabilities for real-time world generation. This is the “AWS for virtual worlds” opportunity.

    The Experience Layer: Companies creating curated, purposeful journeys through AI-generated worlds rather than just providing raw world generation technology.

    The Commerce Layer: Dynamic, personalized commerce experiences where virtual goods can be generated on demand based on user preferences and context.

    The Social Layer: Communities around shared exploration and creation, where social connections come from shared discovery rather than just communication.

    The current metaverse market is valued at approximately $65 billion, with projections showing growth to $800 billion by 2030. But those projections assumed content creation costs would remain prohibitively expensive and virtual experiences would require specialized hardware.

    Interactive AI world generation changes those assumptions. If creating virtual experiences costs 90% less while quality and personalization increase dramatically, the addressable market expands far beyond traditional metaverse applications.

    Consider adjacent markets that become accessible: the $200 billion gaming industry, the $150 billion social media market, the $5 trillion global e-commerce market where virtual try-before-you-buy becomes economically feasible for any product category.

    Content Creation Revolution: The Creator Economy 2.0

    The global creator economy is valued at approximately $104 billion and growing rapidly. Over 50 million people worldwide consider themselves content creators. By every traditional metric, the creator economy is thriving.

    But beneath those numbers lies an increasingly unsustainable system. The average content creator works 50+ hours per week for median annual earnings under $40,000. The top 1% captures disproportionate revenue while the vast majority struggle with inconsistent income and constant pressure to produce more content faster.

    Interactive AI world generation fundamentally changes what content creation means and how creators build audience relationships.

    Traditional content creation follows a production-consumption cycle: creators produce content, audiences consume it, then creators must immediately produce more.

    Interactive worlds create an exploration-collaboration cycle: creators build spaces for discovery, audiences explore and contribute to those spaces, and spaces evolve based on community engagement.

    Instead of needing three posts per day, creators update and expand virtual spaces based on community interests. Instead of competing for 30 seconds of attention, they create destinations where people choose to spend meaningful time.

    I see four new categories of creators that might come out of this:

    World Architects: Creators specializing in designing virtual environments that other creators and communities can use and modify. They’re the “WordPress theme developers” of interactive worlds.

    Experience Directors: Curators of narrative paths and interactive journeys through AI-generated worlds. Part tour guide, part storyteller, part community manager.

    Interactive Storytellers: Creators of branching narratives that audiences explore through choices, investigations, and collaborative discovery.

    Community Builders: Creators focusing on facilitating social experiences within virtual worlds, designing spaces and activities that foster genuine connections between community members.

    Stepping Into Tomorrow’s Interactive Reality

    If yo’ve come this far, you might be thinking, “Relax Sid! It’s just a demo. Nothing is going to change just yet.”

    To which I say, think about this. Two years ago we had the first demos of AI-generated video and they looked like the Will Smith video. Most people didn’t take it seriously.

    The companies and content creators that did are reaping the benefits today. They’re making millions create content with AI, and saving costs on creative work.

    Now apply the same rate of improvement to Genie 3. A few years from now, creating immersive, explorable environments will be as straightforward as creating presentations today. Students will expect learning through exploration. Remote teams will collaborate in virtual spaces designed for their project requirements. Entertainment will mean participating in stories rather than watching them unfold.

    You could ignore it like you did with AI-video, or you could prepare.

    For Business Leaders: Identify specific use cases where interactive AI worlds provide 10x improvements over current approaches. Start with pilot programs demonstrating ROI while building organizational capabilities.

    For Educators and Content Creators: Begin experimenting with available interactive AI tools today. The learning curve for designing engaging virtual experiences is steep, early experimentation provides advantages that become difficult to achieve as the field becomes competitive.

    For Investors and Entrepreneurs: Focus on teams with domain expertise in specific applications rather than generic platforms. Look for evidence of user engagement depth rather than just adoption numbers.

    For Industry Veterans: Your expertise becomes more valuable when combined with AI world generation capabilities, not less. The architects who understand spatial design, educators who know how learning works, entertainment professionals who create engaging narratives, your knowledge provides platforms for applying expertise at unprecedented scale.

    The future is waiting to be explored. The only question remaining is whether you’ll be doing the exploring or reading about it in someone else’s case study.

    Welcome to the interactive revolution. The worlds are ready when you are.